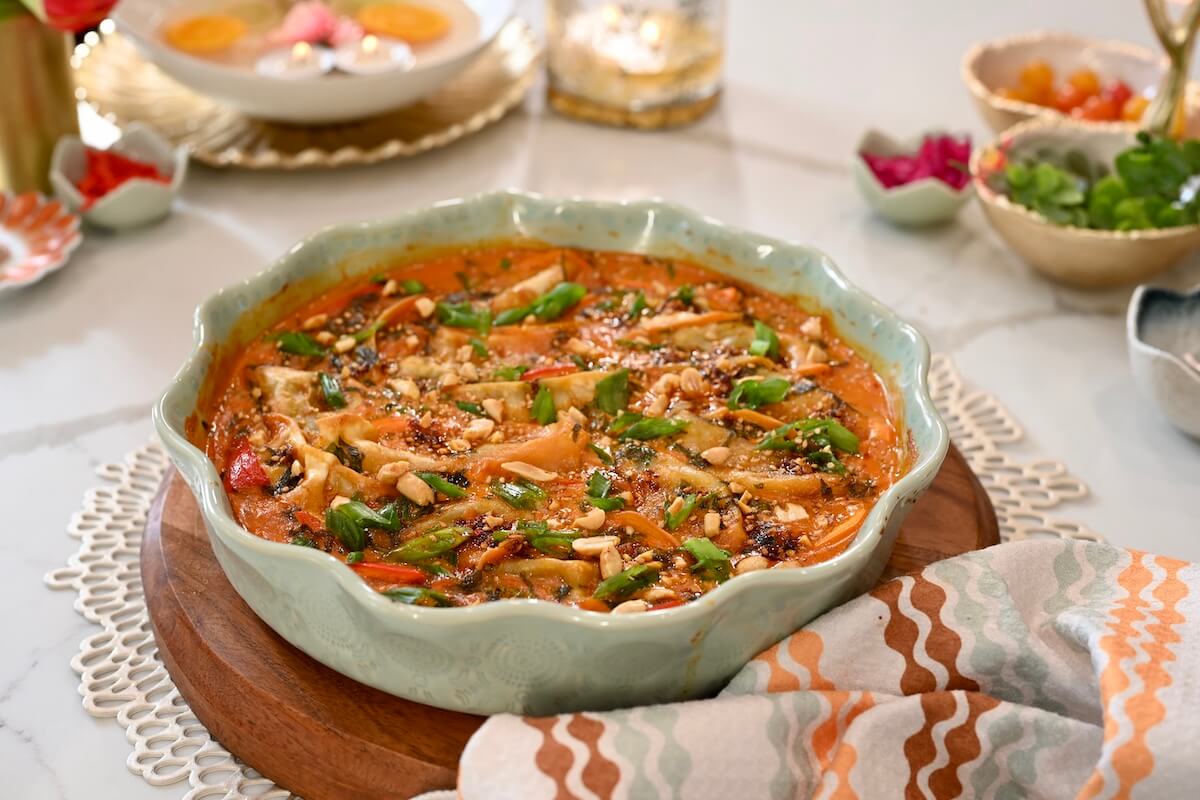
Rajma Chawal Casserole ✨ a layered, modern take on a timeless Indian comfort classic, just a little reimagined! Layered whole-spice basmati rice, slow-simmered rajma, and a bold achari salad topping that brings everything together beautifully!
WATCH HOW TO MAKE RAJMA CHAWAL CASSEROLE:

Rajma chawal is one of those meals that instantly feels like home. Warm, comforting, and deeply rooted in tradition, it’s a dish many of us grew up eating on slow Sundays and busy weeknights alike.
In this version, I kept the flavors completely classic — fragrant whole-spice basmati rice and slow-simmered rajma — but presented them in a layered casserole format for a slightly modern twist. The addition of a bold achari salad on top brings brightness, texture, and depth to every bite.
It’s still the same rajma chawal we love — just expressed a little differently.

If you like this, please try my other recipes:
- Banana Leaf Rice Parcels
- Rajma Rice Arancini
- Awadhi Layered Biryani
- Rajasthani Govind Gatta Layered Pulao

Rajma Chawal Casserole ✨ a layered, modern take on a timeless Indian comfort classic, just a little reimagined! Layered whole-spice basmati rice, slow-simmered rajma, and a bold achari salad topping that brings everything together beautifully!
- 1 1/2 cups basmati rice
- 2 3/4 cups water
- 1 tbsp ghee , or oil
- 1 tsp cumin seeds
- 1 bay leaves
- 1 black cardamom
- 2-3 cloves
- 2 green cardamoms
- pinch turmeric powder
- salt , to taste
- 3 1/2 cups cooked rajma (kidney beans) , with its cooking liquid
- 2 1/2 tbsp ghee , or oil
- 1 tsp cumin seeds
- 1 small mace (javitri)
- 1 black cardamom
- 2 dried red chilies
- 1 cup onions , finely chopped
- 1 tbsp ginger garlic green chili paste
- 1 tbsp cilantro with tender stems , finely chopped
- 2 1/2 cups fresh tomato puree
- 1 tbsp tomato paste
- 1/2 tsp turmeric powder
- 1 1/2 tsp red chili powder
- 2 tsp coriander powder
- 2 1/2 tsp kasoori methi , crushed
- 1/2 tsp garam masala
- salt , to taste
- 3 tbsp cilantro , finely chopped
- 1/2 cup red onions , finely chopped
- 1/4 cup potatoes , boiled and cubed
- 1/4 cup paneer , cubed and lightly sautéed
- 3-4 green chilies , slit lengthwise
- 10-15 juliennes ginger
- 2-3 cilantro , finely chopped
- 2 - 2½ tsp mixed pickle
- 1/2 tsp vinegar , or lemon juice
- salt , to taste
- 1 tbsp mustard oil
- 1/4 tsp onion seeds (kalonji)
- 1/4 tsp fennel seeds (saunf)
- 1/4 tsp mustard seeds
- pinch asafoetida powder (hing)
-
Rinse rice 2–3 times until water runs clear. Soak for 15–20 minutes and drain.
-
Heat ghee or oil in a heavy-bottomed pan. Then add cumin seeds and let them splutter. Add all the whole spices (bay leaf, cardamoms, cloves). Sauté briefly until aromatic.
-
Add drained rice and gently sauté for 30–45 seconds. Add water, salt, and a pinch of turmeric. Bring to a boil.
-
Cover and cook on low for 12–15 minutes until fluffy. Rest 5 minutes and fluff gently with a fork.
-
Heat ghee or oil in a heavy-bottomed pan. Add cumin seeds, javitri, black cardamom, and dried red chilies and let them crackle.
-
Add chopped onions and sauté until golden. Stir in ginger–green chili–garlic paste and cook briefly. Add cilantro stems and sauté.
-
Add tomato puree and tomato paste. Cover and cook until oil separates.
-
Add turmeric, red chili powder, coriander powder, salt, and crushed kasuri methi. Add cooked rajma along with its cooking liquid. Simmer for 15–20 minutes until everything comes together.
-
Finish with garam masala and chopped cilantro leaves.
-
Combine onions, potatoes, paneer, green chilies, ginger, and cilantro. Add pickles, salt, and vinegar or lemon juice. Mix gently.
-
Heat mustard oil until just smoking. Add kalonji, fennel seeds, and mustard seeds. Let splutter. Add hing and turn off heat. Pour hot tadka over salad and mix gently.
-
Spread half the rice in a casserole dish. Layer half the rajma. Repeat with remaining rice and rajma.
-
Top generously with achari salad.
-
Garnish with boondi or papad, and serve warm with raita of your choice.
Recipe Video
Subscribe to my YouTube Channel for step-by-step videos.
DID YOU MAKE THIS RECIPE?
Don’t forget to tag @naturallynidhi on Instagram and hashtag it #naturallynidhi. You can also post your pictures to my facebook page.
I’d love to hear how the recipe turned out and what you think in the comment section below. Find me on ![]()
![]()
![]()
![]()
![]() and share your creation with me!
and share your creation with me!