Latest Posts

Bhutta Corn Kees Crostini

Bhutta Kees Crostini – Grated Corn Crostini

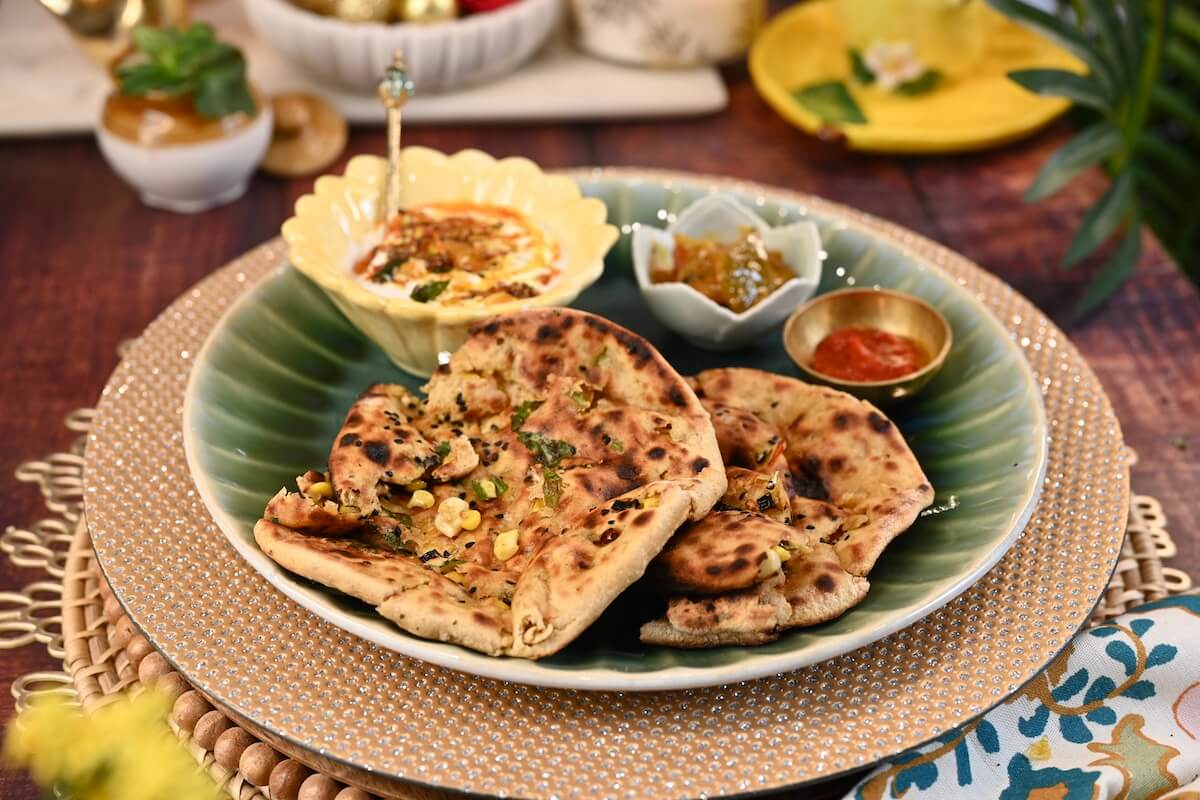
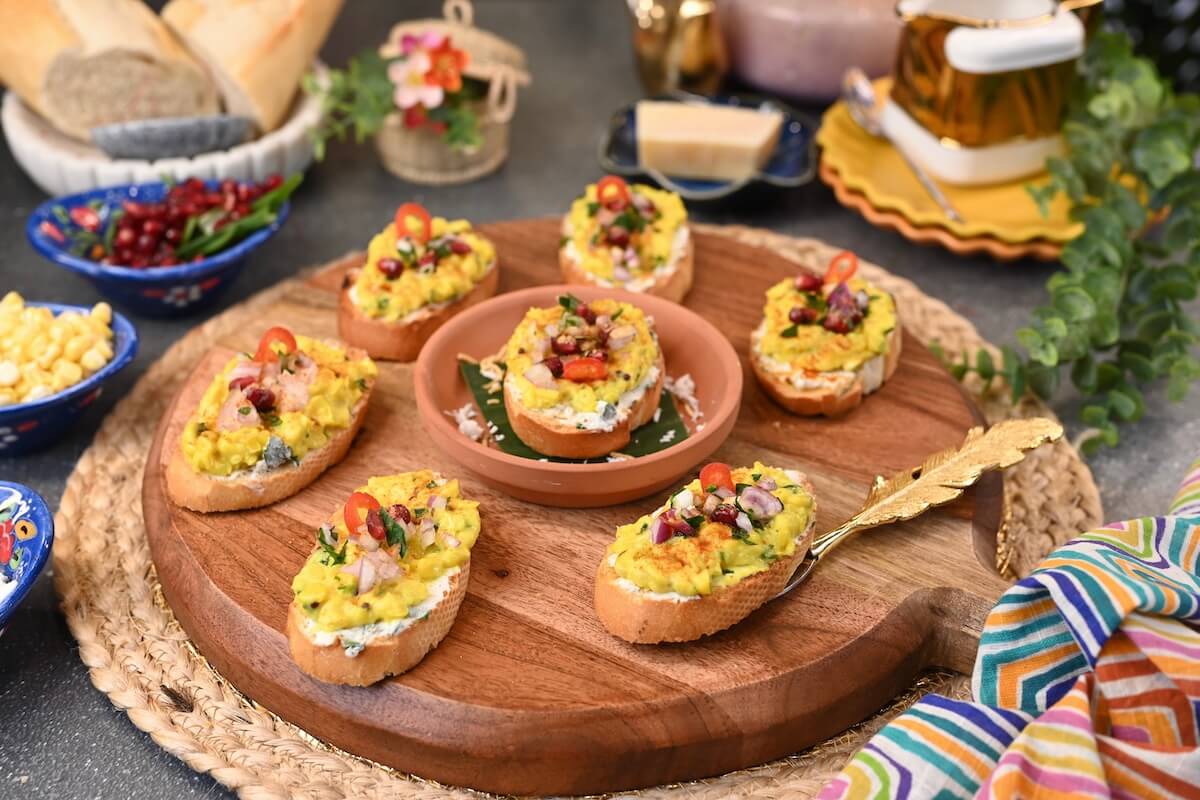
Creamy bhutte ka kees has always been my absolute favorite, and today I gave it a little makeover by serving it on crisp garlic crostini with a light yogurt and cream cheese herb layer.

The result is the same comforting flavor, elevated with texture and perfect for entertaining. Whether you’re hosting a game day, planning party appetizers, or looking for a unique Indian fusion starter, this one fits beautifully.

WATCH HOW TO MAKE BHUTTA KEES CROSTINI – GRATED CORN CROSTINI:

Bhutta Corn Kees Crostini

If you love easy vegetarian appetizers, Indian street food flavors, and creative crostini ideas — this one is for you 💛

Bhutta Corn Kees Crostini

If you like this, please try my other recipes:

5 from 1 vote
Bhutta Corn Kees Crostini
Bhutta Kees Crostini - Grated Corn Crostini
Prep Time
20 mins
Cook Time
30 mins
 

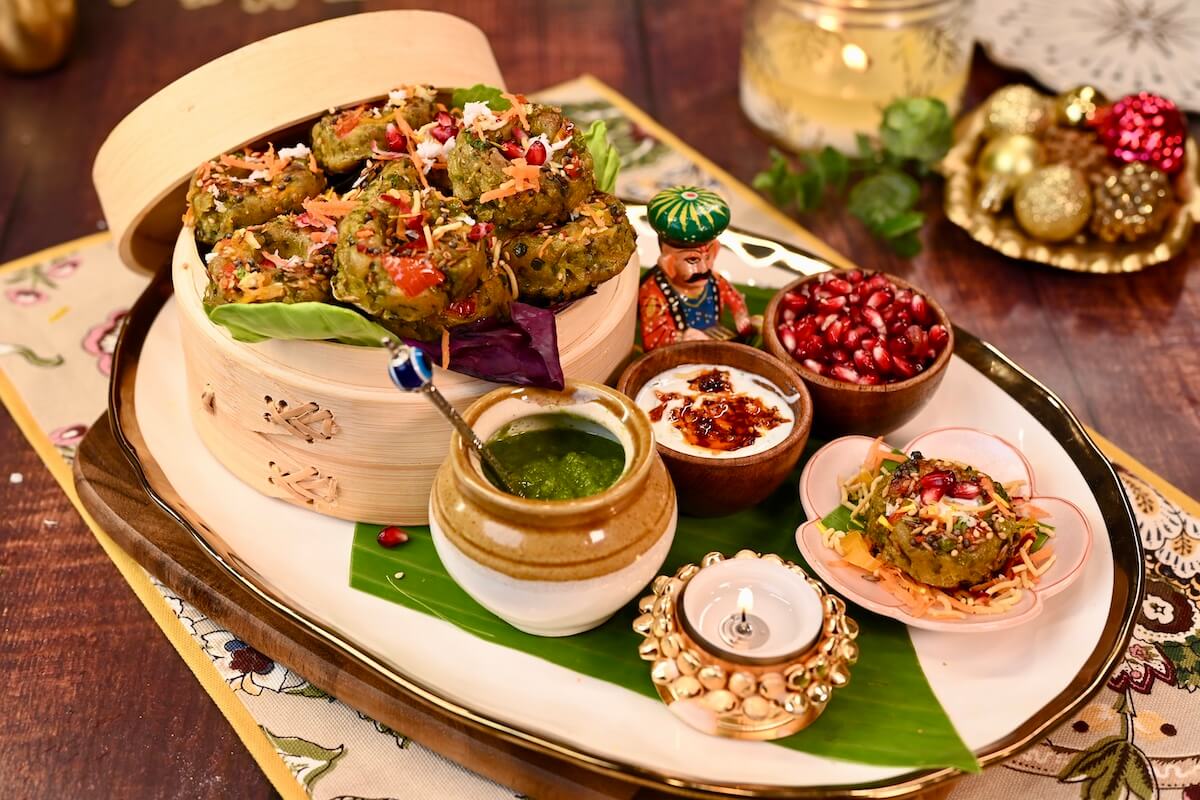
Bhutta Kees Crostini 🌽✨ Creamy bhutte ka kees (grated corn) has always been my absolute favorite, and today I gave it a little makeover by serving it on crisp garlic crostini with a light yogurt and cream cheese herb layer. It's perfect as a party appetizer, game day snack, or Indian fusion starter!

Course: Appetizer, Chaat, Snack
Cuisine: Fusion, Indian
Keyword: party
Custom Category: Appetizers, Chaat (Indian Street Food), Fusion, Snacks
Servings: 10
Calories: 138 kcal
Author: Nidhi Bothra
Ingredients
Bhutte Ka Kees:
  • 4 pcs corn , kernels removed
  • 1 1/2 cups milk
  • 1 1/2 tbsp oil
  • 1 tsp cumin seeds
  • 1/4 tsp asafoetida powder (hing)
  • 1 tsp green chillies , finely chopped
  • 1 inch ginger , finely chopped
  • 1/4 tsp turmeric powder
  • 1 tsp sugar
  • salt , to taste
  • 2 tsp lemon juice
  • 2 tbsp cilantro , finely chopped
Garlic Crostini:
  • 1 French baguette , sliced
  • 2 tbsp olive oil
  • 2-3 cloves garlic , finely minced
Yogurt–Cream Cheese Layer:
  • 2 tbsp greek yogurt or thick yogurt
  • 1 tbsp cream cheese
  • 1/2 tsp dried herb mix
  • 1/4 tsp red chili flakes
  • salt , to taste
  • 2 tbsp cilantro & parsley , finely chopped
Garnish:
  • onions , finely chopped
  • pomegranate seeds
  • red or green chilies , sliced
  • chili oil , for drizzle
  • jeeravan powder , store-bought
Instructions
Prepare the Corn:
  1. Remove kernels from the corn and pulse them to a coarse texture. Do not over-blend — texture is important for kees.

Make Bhutte ka Kees:
  1. Heat oil in a pan. Add jeera and hing. Once they crackle, add ginger and green chillies. Sauté for just a few seconds until aromatic — do not let them brown.
  2. Add turmeric powder and immediately add the pulsed corn. Cook on medium-low heat for 7–8 minutes, stirring occasionally, until it begins to come together.
  3. Gradually add the milk and let it simmer, stirring frequently, until it reaches a soft and creamy consistency.
  4. Add salt, sugar, lemon juice, and cilantro. Mix well. The kees should be creamy but not overly thick. Set aside.

Prepare the Garlic Crostini:
  1. Mix olive oil and minced garlic. Brush generously over baguette slices.
  2. Bake, air fry, or toast on a pan — just ensure they are golden and nicely crisp so they hold the topping.

Make the Yogurt–Cream Cheese Layer:
  1. In a bowl, mix yogurt and cream cheese until smooth.
  2. Add dried herb mix, chilli flakes, salt, and chopped cilantro and parsley. Mix until creamy and spreadable.
Assemble:
  1. Spread the yogurt–cream cheese layer over each crostini.
  2. Top with bhutte ka kees.

  3. Finish with onions, pomegranate, chillies, a drizzle of chilli oil, and a sprinkle of jeeravan powder.
  4. Serve warm or at room temperature.

Recipe Video

Recipe Notes
  • Pulse corn coarsely, not smooth.
  • Add milk gradually for a creamy texture.
  • Do not over-thicken the kees.
  • Toast bread well so it holds the topping.
  • Add jeeravan powder just before serving for maximum flavor.
Nutrition Facts
Bhutta Kees Crostini - Grated Corn Crostini
Amount Per Serving
Calories 138 Calories from Fat 63
% Daily Value*
Fat 7g11%
Saturated Fat 1g6%
Trans Fat 0.04g
Polyunsaturated Fat 1g
Monounsaturated Fat 4g
Cholesterol 4mg1%
Sodium 182mg8%
Potassium 101mg3%
Carbohydrates 15g5%
Fiber 1g4%
Sugar 4g4%
Protein 4g8%
Vitamin A 80IU2%
Vitamin C 1mg1%
Calcium 77mg8%
Iron 1mg6%
* Percent Daily Values are based on a 2000 calorie diet.

Subscribe to my YouTube Channel for step-by-step videos.

DID YOU MAKE THIS RECIPE?

Don’t forget to tag @naturallynidhi on Instagram and hashtag it #naturallynidhi. You can also post your pictures to my facebook page.

I’d love to hear how the recipe turned out and what you think in the comment section below. Find me on Instagram Facebook Twitter Pinterest YouTube and share your creation with me!

Banana Leaf Rice Parcels

Banana Leaf Rice Parcels

These Banana Leaf Rice Parcels ✨ are one of those cozy, comforting meals I truly look forward to. Fragrant basmati rice, thick tuvar dal, and a simple gajar matar & paneer sabzi, all layered and gently warmed in banana leaf.

Drizzled with ghee and served with hot kadhi, it’s the kind of meal that feels warm, nourishing, and meant to be enjoyed with family!

WATCH HOW TO MAKE BANANA LEAF RICE PARCELS:

Banana Leaf Rice Parcels

If you like this, please try my other recipes:

5 from 1 vote
Banana Leaf Rice Parcels
Prep Time
15 mins
Cook Time
30 mins
 

These Banana Leaf Rice Parcels ✨ are one of those cozy, comforting meals I truly look forward to. Fragrant basmati rice, thick tuvar dal, and a simple gajar matar & paneer sabzi, all layered and gently warmed in banana leaf. Drizzled with ghee and served with hot kadhi, it’s the kind of meal that's meant to be enjoyed with family!

Course: Dinner, Lunch, Main Course
Cuisine: Indian
Keyword: mustard
Custom Category: Dinner, Indian Main Course, Lunch, Main Course, Rice
Servings: 6
Calories: 364 kcal
Author: Nidhi Bothra
Ingredients
Rice:
  • 1 cup rice , washed and soaked for 10 mins
  • 4 cups water
  • 1 tsp ghee
  • 1 bay leaves
  • 1 small cinnamon sticks
  • 2 green cardamoms
  • salt , to taste
Thick Dal:
Veggies:
  • 2 cups carrots , cut into cubes and boiled till al dente
  • 1 cup peas , boiled till al dente
Paneer Marinade:
Masala Paneer:
  • 2 cups paneer , cut in cubes
  • 1 tsp mustard oil
  • 1 tsp black and white sesame seeds
Cashews-Poppy Paste:
  • 7-8 cashews , soaked
  • 2 tsp poppy seeds , soaked
  • 2 tbsp water
Gravy Base:
  • 2 1/2 tbsp mustard oil , or ghee
  • 1 tsp cumin seeds
  • 1 bay leaves
  • 1/2 inch cinnamon sticks
  • 1 black cardamom
  • 2 cloves
  • 1/2 tsp asafoetida powder (hing)
  • 1 cup onions , very finely chopped
  • 2 tbsp ginger garlic green chili paste
  • 1 1/2 cups tomatoes , roughly ground or grated
  • 1 1/2 tsp red chilli powder
  • 1/2 tsp turmeric powder
  • 2 1/2 tsp coriander powder
  • 1 tsp fennel seeds (saunf) , crushed
  • 2 tsp kasoori methi , crushed
  • 1 tsp sugar
  • salt , to taste
  • 1/2 cup water , as needed
  • 1/4 tsp garam masala , for finishing
  • 1 tbsp sour cream , or cream for finishing
Parcels:
  • banana leaf , cut into 6 square pieces
  • 1 tsp mustard oil , for warming
  • 1 tbsp water , for warming
Garnish:
  • cilantro , finely chopped
  • green chilies , sliced
  • lemon wedges
  • ghee , for drizzling
Instructions
Cook the Rice:
  1. Cook your rice with salt and whole spices Then drain the water and discard the whole spices. Keep it aside.

Prepare the Dal:
  1. Cook the dal with water, salt, and turmeric until soft but thick. This can be done in a pressure cooker, Instant Pot, or on the stovetop. Keep it aside.

Prepare the Masala Paneer:
  1. Mix all the marinade ingredients and coat the paneer well. Keep it for 15 mins.

  2. Then saute the paneer on medium flame with mustard oil and sesame seeds until lightly done.

Peas-Carrot-Paneer Sabzi:
  1. Grid cashews, poppy seeds with water into a fine paste.

  2. In a pan on medium heat, add in your mustard oil or ghee until it just begins to smoke lightly. Add in your whole spices - cumin seeds, bay leaf, cinnamon, black cardamom, cloves and hing.

  3. Once the‬ ‭cumin starts crackling, add in your onions with ginger-garlic-green chili paste, and saute until they turn translucent.‬

  4. Then add crushed tomatoes, cashew-poppy paste, and all the spices. Cook covered, adding a little water if needed, until the gravy comes together and the oil begins to separate.

  5. Add peas and carrots along with the masala paneer. Mix gently, sprinkle in garam masala, and add 1 tablespoon sour cream or cream. Let everything come together, then turn off the heat. The sabzi is ready.

Prepare Banana Leaves:
  1. Wash and wipe the banana leaf clean. Cut into 6 square pieces. Warm each piece over an open flame or pan until soft and pliable.

Assemble the Parcels:
  1. Place a banana leaf on a flat surface and add the following layers - sabzi, rice, thick dal, more sabzi and more rice. Finish with 1 to 2 pieces of paneer and top it off with a slice of green chili.

  2. Fold and secure with a toothpick or kitchen thread. Repeat to make 6 parcels.

Warm the Parcels:
  1. Heat a pan with mustard oil and water.

  2. Place the parcels, cover, and warm gently on medium heat for 5 minutes on each side, until heated through and aromatic.

Serve:
  1. Open the parcels just before serving and drizzle some ghee.

  2. Serve them hot, best paired with kadhi for a comforting winter meal.

Recipe Video

Recipe Notes
  • You can make the parcels ahead of time, just warm it up when you are ready to serve.
Nutrition Facts
Banana Leaf Rice Parcels
Amount Per Serving
Calories 364 Calories from Fat 144
% Daily Value*
Fat 16g25%
Saturated Fat 4g25%
Polyunsaturated Fat 3g
Monounsaturated Fat 6g
Cholesterol 13mg4%
Sodium 451mg20%
Potassium 538mg15%
Carbohydrates 47g16%
Fiber 7g29%
Sugar 7g8%
Protein 9g18%
Vitamin A 7822IU156%
Vitamin C 20mg24%
Calcium 168mg17%
Iron 2mg11%
* Percent Daily Values are based on a 2000 calorie diet.

Subscribe to my YouTube Channel for step-by-step videos.

DID YOU MAKE THIS RECIPE?

Don’t forget to tag @naturallynidhi on Instagram and hashtag it #naturallynidhi. You can also post your pictures to my facebook page.

I’d love to hear how the recipe turned out and what you think in the comment section below. Find me on Instagram Facebook Twitter Pinterest YouTube and share your creation with me!

Methi Matar Muthiya

Matar Methi Muthiya

Matar Methi Muthiya – Pea season calls for simple, wholesome comfort food. 🌱 This Matar Muthiya is one of those recipes that comes together easily, uses everyday ingredients, and works well as an appetizer or as part of a full meal!

WATCH HOW TO MAKE MATAR METHI MUTHIYA:

Soft, flavorful, and perfect for breakfast, lunch, or evening snacks — this is a recipe you’ll keep coming back to!

Methi Matar Muthiya

If you like this, please try my other recipes:

5 from 1 vote
Methi Matar Muthiya
Methi Matar Muthiya
Prep Time
30 mins
Cook Time
30 mins
 

This Matar Muthiya is one of those recipes that comes together easily, uses everyday ingredients, and works well as an appetizer or as part of a full meal! Soft, flavorful, and perfect for breakfast, lunch, or evening snacks — this is a recipe you’ll keep coming back to!

Course: Appetizer, Breakfast, Snack
Cuisine: Indian
Keyword: traditional
Custom Category: Appetizers, Breakfast, Snacks
Servings: 4
Calories: 308 kcal
Author: Nidhi Bothra
Ingredients
  • 1 cup peas , coarsely pulsed
  • 1/2 cup methi (fenugreek leaves) , finely chopped
  • 1/2 cup spinach , finely chopped
  • 1/4 cup cilantro with tender stems , finely chopped
  • 2 tsp ginger green chili paste
  • 1/2 cup whole wheat flour
  • 1/4 cup jowar (sorghum or white millet) flour
  • 1/4 cup bajra (pearl millet) flour
  • 2 tbsp besan (gram or chickpea flour)
  • 1 tsp salt , to taste
  • 1 tsp sugar
  • 2 tsp lemon juice
  • 1 tsp red chilli powder
  • 1/2 tsp coriander powder
  • 1/2 tsp roasted cumin powder
  • 1/4 turmeric powder
  • 1/2 tsp asafoetida powder (hing)
  • 1/4 tsp baking soda
  • 1 tbsp white sesame seeds
  • 2 tbsp oil , for the dough
  • lukewarm water , as needed
Tadka:
  • 2 tbsp oil , sesame oil or any oil of your choice
  • 1 tsp mustard seeds
  • 1 to 2 tsp white sesame seeds
  • 7-8 curry leaves
  • 2-3 green chilies , finely chopped
  • 2 tbsp mixed color bell peppers , finely chopped
  • 2 tbsp carrots , grated, optional
  • 2 tbsp grated coconut
  • 1 tbsp cilantro , finely chopped
  • white sesame seeds
Instructions
  1. Pulse the green peas in a mixer. Do not make a paste — keep it slightly coarse.
  2. Transfer the pulsed peas to a large mixing bowl. Add chopped methi, chopped palak, chopped coriander, and ginger–green chilli paste. Mix well.
  3. Add all the flours, salt, sugar, all the spices, lemon juice, baking soda, sesame seeds, and 2 tablespoons oil. Mix everything well. Let the mixture sit for a minute so the vegetables release their natural moisture.

  4. Slowly add lukewarm water, little by little, and bring everything together into a soft dough. Do not make a hard dough — it should be soft and easy to handle.
  5. Shape the dough into small logs or rounds, or fill greased moulds with the dough. You can add mixed bell peppers or carrots at the base of the moulds, if you like.

  6. Steam the muthiyas for 20 to 25 minutes — first 5 minutes on high flame, then 15 to 20 minutes on medium to low flame — until cooked through. Remove the steamed muthiyas and let them cool slightly. Slice them if shaped as logs.

  7. For the tadka, heat oil in a pan. Add mustard seeds and let them crackle. Add sesame seeds, curry leaves, green chillies, bell peppers, grated carrot, and grated coconut. Sauté briefly.

  8. Add the steamed muthiyas to the pan, toss gently to coat them well.
  9. Finish with finely chopped coriander and serve hot with green chutney or any chutney and dips of your choice.

Recipe Video

Nutrition Facts
Methi Matar Muthiya
Amount Per Serving
Calories 308 Calories from Fat 108
% Daily Value*
Fat 12g18%
Saturated Fat 3g19%
Trans Fat 0.03g
Polyunsaturated Fat 3g
Monounsaturated Fat 6g
Sodium 751mg33%
Potassium 354mg10%
Carbohydrates 42g14%
Fiber 7g29%
Sugar 5g6%
Protein 10g20%
Vitamin A 2196IU44%
Vitamin C 59mg72%
Calcium 187mg19%
Iron 4mg22%
* Percent Daily Values are based on a 2000 calorie diet.

Subscribe to my YouTube Channel for step-by-step videos.

DID YOU MAKE THIS RECIPE?

Don’t forget to tag @naturallynidhi on Instagram and hashtag it #naturallynidhi. You can also post your pictures to my facebook page.

I’d love to hear how the recipe turned out and what you think in the comment section below. Find me on Instagram Facebook Twitter Pinterest YouTube and share your creation with me!

Nolen Gur Apple Bowl

Some mornings, you just want something warm and comforting.

A few days ago, I woke up craving sandesh — that soft, mildly sweet desi sweet that always feels so nostalgic. But I also wanted to start my day with something a little more nourishing and protein-rich.

So I looked at the apples in my kitchen and decided to turn that craving into a simple breakfast.

I halved a couple of small apples, gently baked them with a little olive oil, cinnamon, and salt, and once they were soft and golden, I filled them with cottage cheese for protein. A drizzle of nolen gur on top brought in that familiar sandesh-like sweetness, and a handful of seeds added just the right crunch.

What I loved most about this bowl is how easy it is to put together. You can air fry it, bake it, or even pan-fry the apples — and in less than fifteen minutes, you have a warm, satisfying breakfast that feels both comforting and wholesome.

This Nolen Gur Apple Bowl is perfect for chilly mornings, when you want something homemade, simple, and quietly special.

If you like this, please try my other recipes:

5 from 2 votes
Nolen Gur Apple Bowl
Prep Time
5 mins
Cook Time
15 mins
 

This Nolen Gur Apple Bowl is perfect for chilly mornings, when you want something homemade, simple, and quietly special.

Course: Breakfast
Cuisine: Fusion, Indian
Keyword: healthy
Custom Category: Breakfast
Servings: 1
Calories: 228 kcal
Author: Nidhi Bothra
Ingredients
  • 2 small apple , halved and scooped from the center
  • 2 tsp olive oil , or butter
  • 1/2 tsp cinnamon powder
  • 1/4 tsp salt
  • 2 to 3 tbsp cottage cheese (chenna) , or mashed paneer
Garnish:
  • 1 to 2 tsp liquid nolen gur , or honey
  • pumpkin seeds
  • sunflower seeds
  • sesame seeds
Instructions
  1. Cut the apples in half and scoop out the center, keeping a small cavity in each half.
  2. Place the apples in an air fryer-safe dish. Drizzle with olive oil or butter, then sprinkle cinnamon powder and salt evenly on top.
  3. Air fry at 350°F (180°C) for 15 minutes, turning once in between, until soft and lightly golden. You can also bake or pan-fry on low heat until tender and golden.

  4. Transfer the apples to a serving bowl and top with cottage cheese, paneer, or chenna.
  5. Drizzle liquid nolen gur on top and finish with mixed seeds.
  6. Serve warm.

Nutrition Facts
Nolen Gur Apple Bowl
Amount Per Serving
Calories 228 Calories from Fat 81
% Daily Value*
Fat 9g14%
Saturated Fat 1g6%
Polyunsaturated Fat 1g
Monounsaturated Fat 6g
Sodium 585mg25%
Potassium 323mg9%
Carbohydrates 42g14%
Fiber 8g33%
Sugar 31g34%
Protein 1g2%
Vitamin A 164IU3%
Vitamin C 14mg17%
Calcium 28mg3%
Iron 0.5mg3%
* Percent Daily Values are based on a 2000 calorie diet.

Subscribe to my YouTube Channel for step-by-step videos.

DID YOU MAKE THIS RECIPE?

Don’t forget to tag @naturallynidhi on Instagram and hashtag it #naturallynidhi. You can also post your pictures to my facebook page.

I’d love to hear how the recipe turned out and what you think in the comment section below. Find me on Instagram Facebook Twitter Pinterest YouTube and share your creation with me!

Cheese Corn Makai Kulcha

Cheese Corn Makai Ka Kulcha

Cheese Corn Makki Ka Kulcha, the kind of comfort food winters are made for! Warm, soft, with a cheesy corn filling, and cooked directly on the flame for that perfect kulcha puff — it’s absolutely perfect for cozy evenings!

WATCH HOW TO MAKE CHEESE CORN MAKAI KA KULCHA:

Cheese Corn Makai Kulcha

What I love most about this recipe is how simple it actually is. The dough comes together easily with everyday flours, and the filling doesn’t need any cooking at all. You just pulse the corn with ginger and green chilli, mix in paneer, cheese, spices, and a little yogurt, and that’s it. Just straightforward, homely cooking that feels really satisfying.

Cooking these kulchas directly on the flame is honestly my favourite part. Watching them puff up never gets old. It gives you that authentic kulcha texture — soft inside, lightly crisp outside — without needing an oven or tandoor.

Cheese Corn Makai Kulcha

I served these kulchas hot with onion raita and a few chutneys, and it made for such a comforting one-plate meal. You can enjoy them for lunch, dinner, or even as a cozy weekend treat when you’re craving something warm and filling.

If you’re looking for a winter-friendly, vegetarian comfort food recipe that feels special but is still easy to make, you’re going to love this one. It’s simple, wholesome, and full of flavour — exactly the kind of recipe I keep coming back to during the colder months.

Cheese Corn Makai Kulcha

If you like this, please try my other recipes:

5 from 1 vote
Cheese Corn Makai Kulcha
Cheese Corn Makai Ka Kulcha
Prep Time
20 mins
Cook Time
25 mins
 

Soft, comforting, and perfect for winters, these Cheese Corn Makki Ka Kulchas are cooked directly on the flame for that authentic kulcha texture. The cheesy corn filling is creamy, lightly spiced, and beautifully balanced, making every bite warm and satisfying. Serve them hot with onion yogurt and chutneys for a complete one-plate meal.

Course: Breads, Dinner, Lunch
Cuisine: Indian
Keyword: corn
Custom Category: Breads, Dinner, Lunch
Servings: 10
Calories: 177 kcal
Author: Nidhi Bothra
Ingredients
Dough:
Cheese Corn Filling:
  • cup corn , boiled or frozen, roughly pulsed
  • 2 green chilies , finely chopped and pulsed with the corn
  • 1 inch ginger , finely chopped and pulsed with the corn
  • 1/2 cup paneer or homemade cottage cheese (chenna) , grated
  • 1 tbsp sattu flour (roasted chickpea flour)
  • 1 tbsp hung curd or greek yogurt , or 1 tbsp cream cheese
  • 1/4 cup cheese , grated
  • 1 tsp red chili flakes
  • 1/2 tsp oregano
  • 1/2 tsp garam masala
  • 1 tsp cumin powder
  • 1/2 tsp chaat masala
  • salt , to taste
  • 1 tbsp green garlic , finely chopped
  • 1 tbsp cilantro with tender stems , finely chopped
  • 2 tsp lemon juice , adjust to taste
Kulcha:
Instructions
Prepare the Dough:
  1. In a large mixing bowl, add whole wheat flour, makki ka atta, besan, baking powder, ajwain, salt, and oil. Mix everything well.
  2. Gradually add warm water and knead into a soft, smooth dough. The dough should be pliable and not stiff. Cover the dough and let it rest while you prepare the filling.

Prepare the Filling:
  1. Add the boiled (or frozen) corn, green chilies, and chopped ginger to a mixer. Pulse lightly until the mixture is roughly crushed. Do not make it smooth — a little texture is important.

  2. Transfer this mixture to a bowl. Add grated paneer or chhena, grated cheese, sattu flour, yogurt or cream cheese, all the spices, green garlic, and lemon juice. Mix everything well until the filling comes together and binds nicely. Keep aside.

Stuff the Kulcha:
  1. Shape the filling into 8-10 equally-sized balls. Divide your dough into the same number of balls, making sure they are larger than the filling. Flatten the dough and place a ball of filling inside, gently sealing the edges around the filling, and gently press to form a smooth ball.

  2. Lightly press the stuffed dough ball into finely chopped green chillies and kalonji so they stick to the surface.

  3. Roll the kulcha slightly thick, using dry flour as needed.
Cook the Kulcha:
  1. Heat a tawa on high flame until very hot. Spread water evenly on the other side of the kulcha so the entire surface is lightly coated. This helps the kulcha stick properly to the tawa.

  2. Place the kulcha water-side down on the hot tawa. Press gently so it sticks. Immediately lift the tawa and place it directly over the flame. Rotate the tawa slowly so the kulcha cooks evenly.

  3. When the kulcha starts puffing up and gets light brown spots, turn the tawa back and place it on the stove. Cook the other side on medium flame until well cooked and golden.

  4. Remove the kulcha from the tawa and brush generously with butter.

Serve:
  1. Lightly crush the kulchas and serve hot with onion yogurt and chutneys.

Recipe Video

Nutrition Facts
Cheese Corn Makai Ka Kulcha
Amount Per Serving
Calories 177 Calories from Fat 72
% Daily Value*
Fat 8g12%
Saturated Fat 3g19%
Trans Fat 0.01g
Polyunsaturated Fat 1g
Monounsaturated Fat 2g
Cholesterol 10mg3%
Sodium 101mg4%
Potassium 154mg4%
Carbohydrates 22g7%
Fiber 3g13%
Sugar 2g2%
Protein 6g12%
Vitamin A 158IU3%
Vitamin C 3mg4%
Calcium 122mg12%
Iron 1mg6%
* Percent Daily Values are based on a 2000 calorie diet.

Subscribe to my YouTube Channel for step-by-step videos.

DID YOU MAKE THIS RECIPE?

Don’t forget to tag @naturallynidhi on Instagram and hashtag it #naturallynidhi. You can also post your pictures to my facebook page.

I’d love to hear how the recipe turned out and what you think in the comment section below. Find me on Instagram Facebook Twitter Pinterest YouTube and share your creation with me!

Tandoori Paneer Rice Balls

Tandoor Paneer Rice Balls

Tandoori Paneer Rice Balls ✨ The holiday season is all about food that brings people together, and these Tandoori Paneer Rice Balls are the perfect crowd-pleasing appetizer for that!

Crispy on the outside, soft and cheesy inside, finished with a smoky elaichi dhungar and served with a festive cranberry chutney, it’s perfect for holiday gatherings and parties!

WATCH HOW TO MAKE TANDOORI PANEER RICE BALLS:

Tandoori Paneer Rice Balls

Tandoori Paneer Rice Balls

If you like this, please try my other recipes:

5 from 2 votes
Tandoori Paneer Rice Balls
Prep Time
30 mins
Cook Time
20 mins
 

Tandoori Paneer Rice Balls ✨ Crispy on the outside, soft and cheesy inside, finished with a smoky elaichi dhungar and served with a festive cranberry chutney, it’s perfect for holiday gatherings and parties!

Course: Appetizer
Cuisine: Fusion, Indian, Italian
Keyword: rice
Custom Category: Appetizers, Rice
Servings: 6
Calories: 184 kcal
Author: Nidhi Bothra
Ingredients
Rice:
  • 1/2 cup rice , washed
  • 1 1/2 cups water
  • 1 tbsp ghee
  • whole spices , 1 green cardamom, 1 clove, 1 small bay leaf, a very small piece of javitri and cinnamon stick
  • salt , to taste
Paneer Marinade:
For Dhungar (Smoking)
  • 1 small piece of hot coal
  • 1 tsp ghee
  • 1/2 tsp crushed cardamoms , or 1/4 tsp cardamom powder
Filling Mixture:
  • 2 tsp ghee
  • 1 ½ tbsp onions , finely chopped
  • 1 ½ tbsp mixed color bell peppers , chopped
  • 2 tsp lemon juice , adjust to taste
  • 2 tbsp cilantro , finely chopped
Rice Balls:
  • melty cheese , as needed (for filling)
  • slurry , ¼ cup all-purpose flour mixed with ¼ cup water
  • breadcrumbs
  • oil , for frying
Garnish
  • cilantro mint yogurt dip
  • pickled onions
  • green or red chilies
  • chaat masala
  • microgreens
  • edible gold dust , optional
Cranberry Chutney:
  • 1 cup cranberries
  • 1/4 cup sugar adjust to taste
  • 1 tbsp orange or lemon zest
  • spices ½ tsp salt, ½ tsp chaat masala, ¼ tsp garam masala, ½ tsp ginger powder
Instructions
Cook the Rice:
  1. Heat ghee in a pan and add the whole spices. Sauté briefly till aromatic. Add the washed rice, salt, and water. Cover and cook till the rice is soft and nicely done. Keep aside to cool.
Prepare the Tandoori Marinade:
  1. In a bowl, add yogurt followed by all the spices. Add roasted besan or sattu flour. Pour hot mustard oil over the mixture and mix well to form the marinade.
  2. Add the grated paneer or chhena along with the chopped onions and bell peppers. Mix gently, cover, and let it rest while you prepare the cranberry chutney.
Make the Cranberry Chutney:
  1. In a pan, add cranberries, sugar, citrus zest, and spices. Cook on medium flame till the cranberries soften and the chutney turns glossy. Switch off the heat and keep aside.
Cook the Paneer–Rice Mixture:
  1. Heat 2 tsp ghee in a pan and add the marinated paneer mixture. Sauté on medium flame for 5–6 minutes till everything comes together.
  2. Switch off the heat. Add the remaining onions and bell peppers, a squeeze of lemon juice, the soft cooked rice, and chopped cilantro. Mix gently till evenly combined.
Give the Elaichi Dhungar:
  1. Place a hot coal in a small heatproof bowl and keep it in the center of the pan. Pour ghee and add crushed cardamom or cardamom powder over the coal. Cover immediately and let the mixture absorb the smoky aroma. Remove the coal.
Shape the Balls:
  1. Once the mixture cools completely, divide it into equal portions. Fill each portion with melty cheese and shape into round balls.
Slurry, Coat & Fry:
  1. Mix all-purpose flour and water to make a smooth slurry. Dip each ball into the slurry, roll in breadcrumbs, and deep-fry in hot oil till golden and crispy. Drain on absorbent paper.
Serve:
  1. Serve as individual portions or on small platters. Swirl cranberry chutney on the base, place the paneer rice balls, and finish with cilantro mint yogurt dip, pickled onions, green chilies, chaat masala, microgreens, and edible gold dust if using.

Recipe Video

Nutrition Facts
Tandoori Paneer Rice Balls
Amount Per Serving
Calories 184 Calories from Fat 81
% Daily Value*
Fat 9g14%
Saturated Fat 4g25%
Polyunsaturated Fat 1g
Monounsaturated Fat 4g
Cholesterol 13mg4%
Sodium 408mg18%
Potassium 81mg2%
Carbohydrates 25g8%
Fiber 1g4%
Sugar 10g11%
Protein 2g4%
Vitamin A 183IU4%
Vitamin C 5mg6%
Calcium 31mg3%
Iron 0.4mg2%
* Percent Daily Values are based on a 2000 calorie diet.

Subscribe to my YouTube Channel for step-by-step videos.

DID YOU MAKE THIS RECIPE?

Don’t forget to tag @naturallynidhi on Instagram and hashtag it #naturallynidhi. You can also post your pictures to my facebook page.

I’d love to hear how the recipe turned out and what you think in the comment section below. Find me on Instagram Facebook Twitter Pinterest YouTube and share your creation with me!

Rajasthan Tawa Tamancha

Rajasthani Tawa Tamancha

Winters in Rajasthan have a very distinct rhythm. The food gets bolder, the flavors deepen, and everything feels a little more comforting. Growing up, dishes cooked on a hot tawa were always a big part of winter meals — smoky, rustic, and full of freshly ground masalas.

This Rajasthani Tawa Tamancha is inspired by those flavors. It’s a dish that brings together simple ingredients, fresh masalas, and that unmistakable tawa-style cooking that feels so satisfying in colder months.

What makes this version special is the fresh masala ground on a silpatta and how everything comes together on the tawa — fast, bold, and full of character.

WATCH HOW TO MAKE RAJASTHANI TAWA TAMANCHA:

Rajasthan Tawa Tamancha

For this recipe, I used frozen vegetables like dum aloo, parval, mixed vegetables, and green chana. They work perfectly here and save a lot of prep time — no peeling, no chopping, and no stress. The vegetables are lightly tossed with mustard oil and salt and baked or air-fried for just 10 minutes, not to crisp them fully, but to give them a light coating before they hit the tawa.

The real star is the fresh masala. Roasting whole spices till fragrant and grinding them fresh gives you that unmistakable aroma that instantly sets the tone of the dish.

Once the onions cook down in mustard oil, everything builds layer by layer. The freshly ground masala and tomatoes form the base, yogurt adds balance, kasuri methi and coriander lift the flavors, and the green chana brings the whole dish together. The baked vegetables go in towards the end so they hold their shape and absorb the gravy without breaking down.

To finish, a simple ghee dhungar takes the dish to another level. It’s a small step, but it adds that final smoky touch that makes this sabzi feel complete.

Rajasthan Tawa Tamancha

🧡 Why This Dish Works So Well:

  • Freshly ground masala makes all the difference. Roasting whole spices and grinding them with ginger, garlic, and green chilies gives the dish depth and warmth.
  • Tawa cooking builds flavor quickly. Since everything cooks fast on a flat tawa, small splashes of water help the masala roast beautifully without drying out.
  • Yogurt, kasuri methi, and fresh coriander balance the spices and bring richness without making the gravy heavy.
  • Green chana is the heart of this dish. It adds texture, bite, and makes the sabzi more wholesome.
  • Baking or air-frying the vegetables keeps the process simple and lighter, while still giving the vegetables enough body to hold up in the gravy.

This Tawa Tamancha is best enjoyed hot, straight from the tawa, served with:

  • Soft Rumali roti
  • A bowl of black dal
  • Pickled onions on the side

It’s a comforting winter meal that feels hearty without being heavy.

If you like this, please try my other recipes:

5 from 1 vote
Rajasthan Tawa Tamancha
Rajasthani Tawa Tamancha
Prep Time
30 mins
Cook Time
30 mins
 

A bold, comforting Rajasthani-style tawa sabzi made with freshly ground masalas, yogurt-based gravy, green chana, and lightly baked frozen vegetables, finished with a ghee dhungar and best enjoyed with Rumali roti.

Course: Main Course
Cuisine: Indian
Keyword: traditional
Custom Category: Dinner, Indian Main Course, Lunch, Main Course
Servings: 8
Calories: 105 kcal
Author: Nidhi Bothra
Ingredients
Fresh Spices For Roasting:
  • tbsp coriander seeds
  • 2 tsp cumin seeds
  • 2 tsp fennel seeds (saunf)
  • 2 dried red chilies
  • 2 to 3 cloves
  • 2 green cardamoms
  • 1 bay leaves
  • 1/2 to 1 tsp black peppercorns
For Grinding:
  • 1 inch ginger
  • 6-8 cloves garlic
  • 2 green chilies
Vegetables:
  • 15-20 pcs baby potatoes , boiled or frozen
  • 1 cup parval , fresh (blanched) or frozen
  • 1 cup mixed vegetables , fresh (blanched) or frozen
  • 1 cup green chana , fresh (blanched) or frozen
  • 2 tsp ghee , or mustard oil
  • salt , to taste
Gravy:
For Dhungar (Smoking):
  • 1 to 2 tsp ghee
  • 1 coal
Instructions
Bake / Air-Fry the Vegetables:
  1. Place baby potatoes, parval, and mixed vegetables on a tray. Drizzle mustard oil, sprinkle a little salt, and toss lightly.

  2. Bake at 400°F / 200°C for 10 minutes, or air-fry for 10 minutes, just until lightly coated and heated through (not fully crisp). Keep them aside.

Make the Fresh Masala:
  1. Lightly roast the spices until fragrant.

  2. Grind fresh on a silpatta or mortar and pestle along with ginger, garlic, and green chilies into a paste.

Build the Gravy:
  1. Heat a wide tawa and add mustard oil. The add finely chopped onions and cook until golden and translucent.

  2. Add the freshly ground masala and crushed tomatoes. Cook well, adding a little water as needed since cooking on the tawa is fast.
  3. Add turmeric powder, red chili powder, and salt. Then add yogurt and mix gently. Finish with crushed kasuri methi and cilantro.

  4. Add a little water if needed and cook until the gravy comes together.

Add the Veggies:
  1. Add frozen green chana and mix gently. Then add the baked/air-fried vegetables and toss everything together. Adjust seasoning and consistency with water if required.

Dhungar (Smoking):
  1. Place a small bowl in the center of the sabzi, add a hot coal, pour ghee over it, cover immediately, and let it sit for a few seconds. Remove the bowl. Your Tawa Tamancha is ready!

Serving:
  1. Serve hot with rumali roti or any bread of your choice, black dal, and pickled onions.

Recipe Video

Nutrition Facts
Rajasthani Tawa Tamancha
Amount Per Serving
Calories 105 Calories from Fat 54
% Daily Value*
Fat 6g9%
Saturated Fat 1g6%
Polyunsaturated Fat 1g
Monounsaturated Fat 3g
Cholesterol 2mg1%
Sodium 67mg3%
Potassium 295mg8%
Carbohydrates 12g4%
Fiber 4g17%
Sugar 3g3%
Protein 3g6%
Vitamin A 1741IU35%
Vitamin C 14mg17%
Calcium 56mg6%
Iron 1mg6%
* Percent Daily Values are based on a 2000 calorie diet.

Subscribe to my YouTube Channel for step-by-step videos.

DID YOU MAKE THIS RECIPE?

Don’t forget to tag @naturallynidhi on Instagram and hashtag it #naturallynidhi. You can also post your pictures to my facebook page.

I’d love to hear how the recipe turned out and what you think in the comment section below. Find me on Instagram Facebook Twitter Pinterest YouTube and share your creation with me!

Shahi Rose Kebabs

Shahi Rose Kebabs

These Shahi Rose Kebabs came together on one of those days when I wanted a high-protein vegetarian dinner that felt comforting but didn’t take forever in the kitchen. They are soft from the inside, crisp on the outside, and lightly fragrant with rose — a simple twist that completely elevates the kebabs and gives them that subtle Shahi feel.

WATCH HOW TO MAKE SHAHI ROSE KEBABS:

Shahi Rose Kebabs

Made with soya nuggets, chickpeas, vegetables, warm spices, and finished with dried rose petals and rose water, these kebabs are nourishing, filling, and perfect for both entertaining and everyday meals. I love serving them inside warm pita pockets with hummus, greens, chopped Shirazi-style salad, lemon dill yogurt, a little hot sauce, feta, and pomegranate for texture and freshness.

Shahi Rose Kebabs

Another reason I keep making these is because they store really well for 2 to 3 days, which makes them perfect for meal prep. You can reheat them on a tawa or in the air fryer and assemble fresh pita pockets anytime for a quick, high-protein winter meal.

Shahi Rose Kebabs

If you like this, please try my other recipes:

5 from 3 votes
Shahi Rose Kebabs
Shahi Rose Kebabs
Prep Time
25 mins
Cook Time
20 mins
 

These Shahi Rose Kebabs are soft on the inside, crisp on the outside, lightly floral with rose, and packed with plant protein — perfect for serving a crowd or prepping ahead for the week.

Course: Dinner, Lunch, Main Course
Cuisine: Indian
Keyword: healthy
Custom Category: Dinner, Lunch, Main Course
Servings: 8
Calories: 184 kcal
Author: Nidhi Bothra
Ingredients
Kebabs:
  • 2/3 cup soya nuggets
  • 1 1/2 cups cooked chickpeas (garbanzo beans) , canned or fresh
  • 1 cup carrots , grated and squeezed
  • 1/2 cup beetroot , grated and squeezed
  • 1/2 cup onions , finely chopped
  • 2 tsp ginger green chili paste
  • 3 tbsp cilantro , finely chopped
  • 1 small sweet potatoes , boiled and mashed
  • 1-2 tbsp sattu flour (roasted chickpea flour) , as needed for binding
  • 1 tbsp dried rose petals , crushed
  • 1 tsp rose water
  • salt , to taste
  • 1/2 tsp black salt
  • 1 tsp garam masala
  • 1 1/2 tsp red chilli powder
  • 1 tsp roasted cumin powder
  • 1/2 tsp cardamom powder
  • 1/2 tsp black pepper
  • 2 tsp lemon juice
  • 2-3 tbsp white sesame seeds , for coating
  • 1 tbsp ghee for sautéing + more for shallow frying
Lemon-Dill Yogurt:
  • 1 1/2 cups thick yogurt
  • 1 tsp lemon zest
  • 3-4 tbsp fresh dill , finely chopped
  • 2 tsp olive oil
  • salt , to taste
  • 1/4 tsp black pepper
  • 1/2 tsp garlic , grated (optional)
  • 1 tsp sugar , as needed (optional)
Shirazi Salad:
  • 2 cucumbers , finely chopped
  • 1 medium tomatoes , finely chopped
  • 1 medium red onions , finely chopped
  • 2 tsp lemon juice
  • 2 tsp olive oil
  • salt , to taste
  • 1/4 tsp black pepper
  • 2 tbsp fresh mint , finely chopped, or parsley (optional)
For Serving:
  • pita bread , store-bought and warmed or see my Homemade Pita Bread recipe
  • hummus
  • salad greens
  • radish
  • hot sauce , sriracha or truffle hot sauce works great
  • feta cheese
  • pomegranate seeds
Instructions
Kebabs:
  1. Boil the soya nuggets until soft. Squeeze out all the water completely and keep them aside.
  2. Add the squeezed soya nuggets and cooked chickpeas to a food processor and pulse to a coarse mixture. Do not make it into a paste.
  3. Heat 1 tbsp oil or ghee in a pan. Add the chopped onion and ginger–green chilli paste. Sauté for a minute, then add the grated carrot and beetroot. Cook on medium-high heat until all the moisture dries up and the mixture becomes fragrant.

  4. Switch off the gas and in the same pan add the pulsed soya–chickpea mixture, the mashed sweet potato, crushed rose petals, rose water, all the spices, salt, black salt, cilantro, and lemon juice. Mix everything well in the same pan, then transfer the mixture to a bowl and let it cool before shaping the kebabs.

  5. Once the mixture has cooled, add sattu flour little by little until it binds well and can be shaped easily.
  6. Shape into kebabs, gently press each one into sesame seeds, and shallow fry on a tawa with oil or ghee until golden and crisp on both sides.

Lemon Dill Yogurt:
  1. Whisk together all the ingredients and chill until serving.

Shirazi Salad:
  1. Combine all the ingredients just before serving to keep it fresh.

Assemble:
  1. Assemble by spreading hummus in warm pita, layering greens and chopped salad, placing warm kebabs, drizzling yogurt and hot sauce, and topping with feta & pomegranate.

Recipe Video

Recipe Notes

Storage: Kebabs keep well in the fridge for 2–3 days. Reheat on tawa or air-fryer before serving.

Nutrition Facts
Shahi Rose Kebabs
Amount Per Serving
Calories 184 Calories from Fat 108
% Daily Value*
Fat 12g18%
Saturated Fat 3g19%
Polyunsaturated Fat 1g
Monounsaturated Fat 3g
Cholesterol 8mg3%
Sodium 218mg9%
Potassium 550mg16%
Carbohydrates 34g11%
Fiber 10g42%
Sugar 15g17%
Protein 7g14%
Vitamin A 5387IU108%
Vitamin C 11mg13%
Calcium 158mg16%
Iron 2mg11%
* Percent Daily Values are based on a 2000 calorie diet.

Subscribe to my YouTube Channel for step-by-step videos.

DID YOU MAKE THIS RECIPE?

Don’t forget to tag @naturallynidhi on Instagram and hashtag it #naturallynidhi. You can also post your pictures to my facebook page.

I’d love to hear how the recipe turned out and what you think in the comment section below. Find me on Instagram Facebook Twitter Pinterest YouTube and share your creation with me!

Thai Squash Ramen

Thai Squash Ramen

If you loved the my roasted butternut squash soup, this Thai Squash Ramen ✨ is the perfect way to take that same purée into a completely new direction. This recipe combines roasted butternut squash with red Thai curry paste, creamy coconut milk, and a generous amount of fresh basil to create a broth that’s rich, aromatic, and full of depth.

WATCH HOW TO MAKE THAI SQUASH RAMEN:

Thai Squash Ramen

Topped with crispy breaded tofu and your favorite vegetables, this bowl is warm, wholesome, and incredibly satisfying, making it ideal for cozy weeknight dinners or weekend comfort meals. The best part is how customizable it is – you can add broccoli, corn, asparagus, mushrooms, bok choy, or whatever vegetables you have on hand.

Thai Squash Ramen

This vegetarian Thai-style ramen is easy to make, naturally comforting, and a beautiful way to use squash in a savory, globally-inspired dish. With simple pantry ingredients and bold flavors, it’s a recipe you’ll come back to all season long.

If you like this, please try my other recipes:

5 from 1 vote
Thai Squash Ramen
Thai Squash Ramen
Prep Time
20 mins
Cook Time
20 mins
 

A cozy, creamy Thai-inspired ramen made with roasted butternut squash purée, aromatic Thai curry paste, and crisp breaded tofu. Comforting, flavorful, and perfect for weeknights.

Course: Dinner, Lunch, Main Course, Soup
Cuisine: Asian, Thai
Keyword: fusion, vegan
Custom Category: Bowls, Dinner, Fusion, Ice cream & Popsicles, Lunch, Main Course, Noodles
Servings: 4
Calories: 249 kcal
Author: Nidhi Bothra
Ingredients
Ramen Broth:
  • 1 to 1½ cups roasted squash purée , see my Roasted Butternut Squash Soup recipe
  • tbsp thai red curry paste
  • 1-2 tbsp coconut milk , for sautéing
  • 1 inch ginger , finely minced or ginger paste
  • 2-3 cloves garlic , finely minced or garlic paste
  • 1 can coconut milk , approx 13.5 oz
  • 2 can water , use the same can to measure so it's double the coconut milk
  • salt , to taste
  • 1 tbsp palm sugar , or use jaggery, to taste
  • 1 - 1½ tbsp soy sauce
  • 2 tbsp lemon juice , adjust to taste
  • 10-12 basil leaves , torn
Crispy Breaded Tofu:
  • 1 block extra firm tofu , pressed, approx. 16 oz
  • 1/2 to 3/4 cups panko breadcrumbs
  • 1-2 tsp soy sauce
  • salt , to taste
  • sesame seeds , optional
  • oil , for frying
Toppings:
  • noodles , any thin noodles will work
  • broccoli , lightly steamed
  • asparagus , lightly steamed
  • sweet corn kernels
  • red chilies , sliced
  • fried garlic
  • fried onions
  • fried ginger , optional
  • sesame seeds
  • lemon wedges
  • chili oil
Instructions
Make the Ramen Broth:
  1. In a pan, add a little coconut milk. Then a Thai red curry paste, minced ginger, and minced garlic. Sauté until everything turns fragrant.

  2. Mix in the roasted squash purée - see my Roasted Butternut Squash Soup recipe for making the puree.

  3. Cook for a few minutes till it all comes together nicely.
  4. Pour in the full can of coconut milk, and add 2 cans of water (i.e. double the coconut milk quantity)

  5. Season with salt, palm sugar or jaggery, soy sauce, and lemon juice, and mix in torn basil leaves.

  6. Simmer until creamy and well combined.

Make the Crispy Breaded Tofu:
  1. Cut the tofu into strips or cubes. Season with soy sauce and a little salt. Coat in breadcrumbs (add sesame seeds if you like). Pan-fry until golden and crispy.

Prepare the Noodles:
  1. Cook ramen noodles according to package directions.
Assemble:
  1. Add noodles to each bowl and pout the hot Thai squash ramen broth over them.

  2. Top with crispy breaded tofu, all the vegetables and chilies. Finish with sesame seeds, fried garlic, fried onions, and a lemon wedge.

  3. Drizzle some chili oil on top and your Thai Squash Ramen is ready!

Recipe Video

Recipe Notes
  • Any vegetables work here, customize with what’s in your fridge.
  • Tofu can also be air-fried.
  • Adjust heat level by increasing curry paste or adding red chilies.
  • Add more water if you prefer a thinner broth.
Nutrition Facts
Thai Squash Ramen
Amount Per Serving
Calories 249 Calories from Fat 99
% Daily Value*
Fat 11g17%
Saturated Fat 8g50%
Polyunsaturated Fat 1g
Monounsaturated Fat 1g
Cholesterol 7mg2%
Sodium 693mg30%
Potassium 194mg6%
Carbohydrates 26g9%
Fiber 1g4%
Sugar 4g4%
Protein 9g18%
Vitamin A 1530IU31%
Vitamin C 4mg5%
Calcium 51mg5%
Iron 2mg11%
* Percent Daily Values are based on a 2000 calorie diet.

Subscribe to my YouTube Channel for step-by-step videos.

DID YOU MAKE THIS RECIPE?

Don’t forget to tag @naturallynidhi on Instagram and hashtag it #naturallynidhi. You can also post your pictures to my facebook page.

I’d love to hear how the recipe turned out and what you think in the comment section below. Find me on Instagram Facebook Twitter Pinterest YouTube and share your creation with me!

Baked Biryani Casserole

Baked Biryani Casserole

Baked Biryani Casserole ✨A cozy twist on traditional biryani, layered and baked like a festive casserole, this bold, colorful dish is the perfect centerpiece for Thanksgiving!

There’s something so comforting about a dish that slowly bakes in the oven, filling the home with warmth and spices. This baked biryani casserole is exactly that kind of recipe — a beautiful fusion of creamy makhani flavors, roasted winter vegetables, fluffy basmati rice and a golden, bubbly top that makes it perfect for a festive holiday table.

WATCH HOW TO MAKE BAKED BIRYANI CASSEROLE:

Baked Biryani Casserole

This year, I wanted a vegetarian Thanksgiving main dish that felt hearty, colorful and celebration-worthy, but still easy enough to assemble ahead of time. Something that blends the familiarity of a casserole with the layered comfort of biryani. This dish brings the two together in the most seamless way: roasted veggies, saffron-scented rice, a silky béchamel, a touch of marinara, and a rich makhani sauce that ties everything into one cozy bake.

It’s the kind of recipe that feels warm and inviting the moment it comes out of the oven — golden on top, creamy inside and packed with flavor. Whether you’re hosting Thanksgiving, planning a holiday dinner, or simply craving an Indian-inspired casserole that feeds a crowd, this baked biryani casserole is the perfect option.

Baked Biryani Casserole

🧡 Why You’ll Love This Recipe:

  • A complete vegetarian thanksgiving casserole that works as the main dish.
  • Creamy, comforting layers with beautiful Indian flavors.
  • Roasted vegetables that add texture and color.
  • Make-ahead friendly — assemble a day before and bake before serving.
  • Perfect for a crowd and great for potlucks or holiday gatherings
  • Ideal for anyone who loves biryani but wants an easier, oven-friendly version

Baked Biryani Casserole

💡 Tips & Variations:

✅  Choose your vegetables: Root veggies like potatoes, pumpkin, squash and carrots roast beautifully and hold their shape.

✅  Keep the rice al dente: This prevents it from getting mushy once baked with sauces.

✅  Béchamel adds structure: It helps the casserole bake into creamy, sliceable layers without falling apart.

✅  Adjust spices to your taste: Increase or reduce the spices depending on your heat preference.

✅  Great for make-ahead: Assemble the entire casserole (except baking), refrigerate overnight and bake before serving.

Baked Biryani Casserole

If you like this, please try my other recipes:

5 from 2 votes
Baked Biryani Casserole
Prep Time
30 mins
Cook Time
50 mins
 

Baked Biryani Casserole ✨A cozy twist on traditional biryani, layered and baked like a festive casserole, this bold, colorful dish is the perfect centerpiece for Thanksgiving!

With roasted veggies, a rich makhani gravy, and a decadent topping of béchamel, marinara, and cheese, this showstopper dish is made to impress at any holiday table.

Course: Baked, Dinner, Main Course
Cuisine: Fusion, Indian
Keyword: festive, holiday
Custom Category: Baked, Dinner, Fusion, Main Course, Rice
Servings: 8
Calories: 429 kcal
Author: Nidhi Bothra
Ingredients
Rice:
  • 1 1/2 cups rice
  • 3 cups water
  • 2 tsp ghee
  • 1-2 bay leaves
  • 1 big black cardamom
  • 3-4 green cardamoms
  • 4-5 cloves
  • 1 small cinnamon sticks
  • 1 vegetable stock cube
  • salt , to taste
Root Vegetable Tray:
  • 3 ½ - 4 cup root vegetables , chopped. I used potatoes, butternut squash, sweet potatoes or pumpkin, purple potatoes, carrots
  • 1 - 1 ½ ghee , or oil
  • fresh herbs , I used sage leaves, rosemary, thyme
  • black pepper , to taste
Soft Veggie Baking Dish:
  • 1 medium green zucchini , chopped
  • 1 medium yellow zucchini , chopped
  • 1 cup mixed color bell peppers , cubed
  • 2 medium red onions , cubed
  • 1 – 1 ½ tsp oil
  • salt , to taste
  • black pepper , to taste
Makhani Gravy Base Baking Dish:
  • 3 medium tomatoes , cut into chunks
  • 3 small shallots (onions) , cubed
  • 7–8 pods garlic
  • 1 inch ginger
  • 3–4 green chilies
  • 3 tbsp cashews
  • cilantro with tender stems
Béchamel Sauce:
  • 2 tbsp butter
  • 2 ½ tbsp all purpose flour
  • 3 cups milk
  • 1 tbsp dried herbs , I used Italian seasoning
  • 1 ½ tsp sugar
  • salt , to taste
  • black pepper , to taste
  • pinch nutmeg powder , optional
Makhani Vegetables:
Layering:
  • 15-20 strands saffron , mixed with 4 tbsp milk
  • 1 cup cheese , any melty cheese
  • 1/2 cup marinara sauce , store-bought
  • fresh herbs , for garnish
  • thai red or green chilies , finely chopped for garnish
Instructions
Roast Everything:
  1. Preheat the oven to 375°F / 190°C.

  2. Root Vegetables: Spread all the root vegetables and apple on a tray. Drizzle with ghee or oil, add herbs and pepper. Roast 10 minutes uncovered, then 10–15 minutes covered, then 10–15 minutes uncovered again until tender and caramelized.

  3. Soft Vegetables: Roast zucchini, onions and peppers 15–20 minutes covered, until soft but not mushy.

  4. Gravy Base: Roast tomatoes, shallots, garlic, ginger, green chilies, cashews and cilantro stems 20–25 minutes covered, until soft. Cool slightly and blend into a smooth gravy.

Prepare The Rice:
  1. Gently wash the rice without breaking the grains, soak for 10–15 minutes, then drain. Heat ghee in a pan and add all the wholes spices. Then add the soaked rice and sauté 20–30 seconds. pour in 3 cups water, salt and vegetable stock cube. Bring to a boil, then cover and cook on medium to low flame until al-dente. Fluff with a fork and set aside.

Make the Béchamel Sauce:
  1. Melt butter on medium heat. whisk in the flour for 1–2 minutes until fragrant and frothy. Slowly add the milk, whisking constantly to avoid lumps. Add herbs, sugar, salt, pepper and nutmeg. Cook until creamy and silky.

Make the Makhani Vegetables:
  1. Use the same bowl where your soft vegetables were placed. Add all roasted root vegetables, chickpeas and the blended makhani gravy.

  2. Add all the spices, ghee or butter, milk and salt. Gently mix until everything is coated in the creamy makhani sauce.

  3. Cover and heat for 10 minutes in the oven, or cook on the stovetop for 10 minutes, or microwave 4 minutes on high. Do not overcook. Your makhani vegetables are ready.

Layer the Biryani:
  1. To assemble, spread a layer of cooked rice at the bottom of your casserole and drizzle saffron milk generously on top.

  2. Add the creamy makhani vegetables and spread evenly.

  3. Add another layer of rice and drizzle saffron milk again.

  4. Sprinkle a little cheese, pour the béchamel sauce on top and spoon over the marinara sauce. Spread both sauces evenly and finish with the remaining cheese.

Bake:
  1. Bake the casserole uncovered for 20 minutes at 375°F / 190°C in a pre-heated oven, until the cheese is golden, melted and bubbly.

Garnish & Serve:
  1. Garnish with fresh herbs and finely chopped thai chilies. Serve warm!

Recipe Video

Recipe Notes
  • Choose your vegetables: Root veggies like potatoes, pumpkin, squash and carrots roast beautifully and hold their shape.
  • Keep the rice al dente: This prevents it from getting mushy once baked with sauces.
  • Béchamel adds structure: It helps the casserole bake into creamy, sliceable layers without falling apart.
  • Adjust spices to your taste: Increase or reduce the spices depending on your heat preference.
  • Great for make-ahead: Assemble the entire casserole (except baking), refrigerate overnight and bake before serving.
Nutrition Facts
Baked Biryani Casserole
Amount Per Serving
Calories 429 Calories from Fat 144
% Daily Value*
Fat 16g25%
Saturated Fat 8g50%
Trans Fat 0.1g
Polyunsaturated Fat 1g
Monounsaturated Fat 5g
Cholesterol 37mg12%
Sodium 392mg17%
Potassium 811mg23%
Carbohydrates 58g19%
Fiber 7g29%
Sugar 15g17%
Protein 15g30%
Vitamin A 1066IU21%
Vitamin C 42mg51%
Calcium 320mg32%
Iron 3mg17%
* Percent Daily Values are based on a 2000 calorie diet.

Subscribe to my YouTube Channel for step-by-step videos.

DID YOU MAKE THIS RECIPE?

Don’t forget to tag @naturallynidhi on Instagram and hashtag it #naturallynidhi. You can also post your pictures to my facebook page.

I’d love to hear how the recipe turned out and what you think in the comment section below. Find me on Instagram Facebook Twitter Pinterest YouTube and share your creation with me!