Latest Posts

Korean Potato Dumplings with Sesame Cucumber Salad

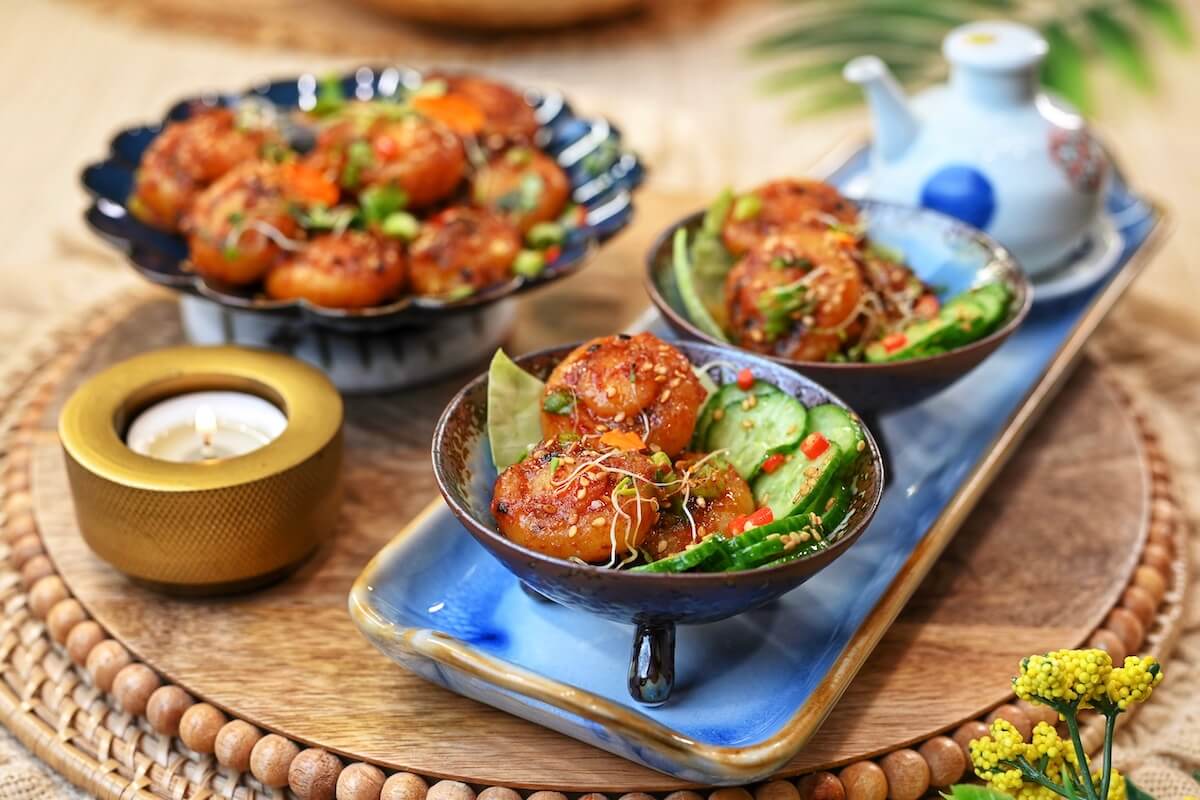
There’s something so special about making appetizers that are not only delicious but also bring a little surprise to the table. These Korean Potato Dumplings are just that — soft, chewy dumplings made from simple potatoes, simmered in a bold sesame chili sauce, and served with a refreshing cucumber salad.

Perfect as a Diwali appetizer or for any festive spread, these dumplings are elegant, vibrant, and sure to become the star of your grazing table!

WATCH HOW TO MAKE KOREAN POTATO DUMPLINGS:


Korean Potato Dumplings

✨ Serving Suggestions:

These dumplings are best served warm, paired with the refreshing cucumber salad on the side. They make an excellent Diwali appetizer, grazing table addition, or even a festive chaat-party starter.

Korean Potato Dumplings

💡 Tips & Variations:

✅  If you don’t have gochugaru, you can substitute with kashmiri chili powder, which is not too spicy.

✅  Make sure not to over-dry the sauce, as the potatoes will naturally soak up some liquid.

✅  The cucumber salad adds freshness — don’t skip it, especially when serving as a party appetizer.

✅  Garnishing with microgreens adds a festive, modern touch for plating.

Korean Potato Dumplings

With their chewy texture, bold flavors, and elegant plating, these Korean Potato Dumplings are a true showstopper. A little twist, thoda naya, thoda khaas — just what your Diwali table needs!

Korean Potato Dumplings

If you like this, please try my other recipes:

5 from 1 vote
Korean Potato Dumplings
Korean Potato Dumplings with Sesame Cucumber Salad
Prep Time
20 mins
Cook Time
30 mins
 

Bring a little twist to your Diwali menu with these Korean Potato Dumplings 🥟✨ Soft, chewy dumplings made with potatoes, simmered in a bold Korean sesame chili sauce, and served with a refreshing sesame cucumber salad on the side. A festive appetizer that’s elegant, vibrant, and sure to be the star of your table.

Course: Appetizer
Cuisine: Fusion, Indian, Korean
Keyword: party
Custom Category: Appetizers, Diwali, Fusion, International Cuisine, Super Bowl
Servings: 8
Calories: 200 kcal
Author: Nidhi Bothra
Ingredients
Dumplings:
  • 4 medium potatoes
  • salt to taste
  • 2/3 to 1 cup corn starch , or potato starch
  • 1/4 cup water , as needed
Sauce:
  • 2 tbsp sesame oil
  • 2 tsp garlic , minced
  • 1 1/2 tbsp gochugaru (korean chili flakes)
  • 1 1/2 tbsp light soy sauce
  • 3 tsp rice vinegar , or regular vinegar
  • 1 tbsp sugar , adjust to taste
  • 1/2 cup water
Garnish:
  • 3 tbsp green onions , finely chopped
  • 3 tsp toasted sesame seeds
Cucumber Salad:
  • 1 cucumber , thinly sliced
  • 1 tbsp sesame oil
  • 1 tbsp toasted sesame seeds
  • 1 - 2 tsp rice vinegar
  • 1 tsp sugar
  • 1 thai red or green chilies , finely chopped
  • salt , to taste
Instructions
Make the Dumpling Dough:
  1. Peel and cut potatoes, then boil in salted water until fork tender.

    Tip: Always cut the potatoes before boiling. Whole potatoes tend to retain excess moisture, making them too wet once boiled. This can lead to a sticky dough that doesn't hold its shape — and may cause the dumplings to fall apart during cooking.

  2. Drain completely, then pass through a potato strainer/ricer for a smooth mash.
  3. Add salt to taste, then slowly mix in cornstarch with little water as needed.

  4. Knead into a soft, smooth dough (like gnocchi or pasta). Rest 5–10 minutes.
  5. Tip: Before shaping all the dumplings, test one. Roll a small ball from the dough and drop it into boiling water. If it begins to fall apart, the dough is too wet. Add more cornstarch to absorb excess moisture and help the dumplings hold their shape during cooking.

Shape the Dumplings:
  1. Divide into small portions and roll into mini balls.
  2. Press gently with a cap or your thumb to make a dent in the center — like a tiny mushroom shape.
  3. This dent will hold the sauce so every bite is flavorful.
Cook the Dumplings:
  1. Drop dumplings into boiling water.
  2. Once they float to the top, they’re cooked.
  3. Transfer immediately into ice-cold water to stop the cooking.
Make the Sauce:
  1. In a bowl, mix sesame oil, garlic, gochugaru, soy sauce, vinegar, sugar, and water.
  2. Pour this mixture into a pan and bring to a boil.
  3. Once it boils, add the boiled dumplings and let them simmer on medium flame for 7–8 minutes until the sauce coats them.
  4. Don’t let it get too dry — switch off when it’s still slightly saucy.
Make the Cucumber Salad:
  1. Mix cucumber slices with sesame oil, sesame seeds, vinegar, sugar, chili, and salt.
  2. Keep it light, sweet, spicy, and tangy.
Garnish & Serve:
  1. Plate the dumplings and sprinkle generously with green onions and toasted sesame seeds.

  2. Serve with the cucumber salad on the side.

Recipe Video

Recipe Notes
  • If you don’t have gochugaru, you can substitute with kashmiri chili powder.
  • Make sure not to over-dry the sauce, as the potatoes will naturally soak up some liquid.
  • The cucumber salad adds freshness — don’t skip it, especially when serving as a party appetizer.
  • Garnishing with microgreens adds a festive, modern touch for plating.
  • You can't boil whole potatoes for potato dumplings because they hold water and will be too wet, leading to a dough that is sticky and won't hold together. The dumplings may fall apart during cooking.
Nutrition Facts
Korean Potato Dumplings with Sesame Cucumber Salad
Amount Per Serving
Calories 200 Calories from Fat 63
% Daily Value*
Fat 7g11%
Saturated Fat 1g6%
Polyunsaturated Fat 3g
Monounsaturated Fat 2g
Sodium 223mg10%
Potassium 555mg16%
Carbohydrates 33g11%
Fiber 4g17%
Sugar 4g4%
Protein 3g6%
Vitamin A 501IU10%
Vitamin C 24mg29%
Calcium 45mg5%
Iron 2mg11%
* Percent Daily Values are based on a 2000 calorie diet.

Subscribe to my YouTube Channel for step-by-step videos.

DID YOU MAKE THIS RECIPE?

Don’t forget to tag @naturallynidhi on Instagram and hashtag it #naturallynidhi. You can also post your pictures to my facebook page.

I’d love to hear how the recipe turned out and what you think in the comment section below. Find me on Instagram Facebook Twitter Pinterest YouTube and share your creation with me!

Creamy Corn Tiki Bites

Creamy Corn Tikki Bites

Diwali is all about celebrating with loved ones, and no festive table is complete without something crispy, creamy, and chatpata. These Creamy Corn Tikki Bites bring together three delicious layers — crispy aloo paneer tikkis, a silky corn white sauce, and a quick achari-style tomato chutney that ties it all together. It’s a unique and creative combination that works beautifully, giving you a festive bite that’s small in size but full of flavor.

WATCH HOW TO MAKE CREAMY CORN TIKKI BITES:

Creamy Corn Tiki Bites

What makes this appetizer even better is that you can prepare each element ahead of time — the tikkis, the corn filling, and the tomato chutney — and simply fry, assemble, and garnish on the day of your party. Easy to prep, perfect to serve, and guaranteed to impress!

Creamy Corn Tiki Bites

✨ Why You’ll Love This Creamy Corn Tiki Bites :

Crispy aloo paneer tikkis, creamy sweet corn, and an achari-style tomato chutney — three simple elements layered together to create something truly festive. Chhoti si bite, lekin full of flavors. Perfect for Diwali or any celebration where you want to serve something different yet easy to prepare.

💡 Make-Ahead Tips:

  • The tikkis can be shaped and stored in the fridge a day ahead. Just fry before serving.
  • Both the creamy corn filling and the tomato chutney can also be made a day in advance and stored in airtight containers.
  • On the day of your party, just fry, assemble, garnish — and your festive bites are ready in minutes!

If you like this, please try my other recipes:

5 from 1 vote
Creamy Corn Tiki Bites
Creamy Corn Tikki Bites
Prep Time
20 mins
Cook Time
30 mins
 

A festive Indian fusion appetizer with three delicious layers: crispy aloo paneer tikkis, creamy corn white sauce, and the highlight — a spoon of achari-style tomato chutney right on top. Finished with festive garnishes, these bites are the perfect Diwali party snack — crispy, creamy, tangy, and masala-packed.

Course: Appetizer
Cuisine: Fusion, Indian
Keyword: party
Custom Category: Appetizers, Diwali, Fusion, Super Bowl
Servings: 8
Calories: 194 kcal
Author: Nidhi Bothra
Ingredients
🥔 Aloo Tikki:
  • 3 potatoes , boiled and mashed
  • 1/2 cup paneer grated or crumbled
  • 1 1/2 tbsp corn starch
  • salt , to taste
  • 1 tsp ginger green chili paste
  • pinch red chili powder
  • 1/4 tsp garam masala
  • ghee , or oil for shallow frying
🌽 Creamy Corn White Sauce:
  • 1 cup sweet corn kernels , boiled
  • 1 tbsp butter
  • 1 1/2 tbsp all purpose flour
  • 1 1/2 cups milk
  • 1/2 tsp black pepper powder
  • 1/2 tsp red chili flakes
  • 1/2 tsp mixed herbs , oregano or Italian seasoning
  • 2 tbsp cheese , grated
  • 1/2 tsp salt , adjust to taste
  • 1/2 tsp sugar
🍅 Tomato Chutney:
  • 1 tbsp oil
  • 1 1/2 tsp panch phoran , cumin, kalonji, mustard, methi, and fennel seeds
  • 1 medium onions , finely chopped
  • 2 medium tomatoes , finely chopped
  • 1 1/2 tsp ginger garlic green chili paste
  • 1/2 tsp red chili powder
  • 1/2 tsp coriander powder
  • 1/2 tsp black salt
  • 1/4 tsp garam masala
  • 1/2 tsp sugar
  • 1 tsp tomato ketchup
  • 1 tsp hot sauce
  • salt , to taste
  • 1 tbsp cilantro , finely chopped
Garnish:
  • pickled onions
  • red chilies , finely chopped
  • crushed chips , for the crunch
  • microgreens
Instructions
Aloo Tikki:
  1. Mix potatoes, paneer, corn flour, salt, red chili powder, and garam masala into a smooth mixture.
  2. Shape into small, mini-sized tikkis.
  3. Just before serving, shallow fry in ghee or oil. Halfway through, press lightly to flatten so they crisp evenly.
  4. Fry until golden brown and crisp.
Creamy Corn White Sauce:
  1. Heat butter in a pan, add boiled corn, and sauté for 1 minute.
  2. Add flour and sauté for 2–3 minutes until fragrant.
  3. Slowly pour in milk, whisking continuously to avoid lumps.
  4. Add salt, sugar, black pepper, chili flakes, and mixed herbs. Stir well.
  5. Cook until the sauce thickens.
  6. Add grated cheese, mix until melted and creamy.
  7. Switch off the heat. Keep aside.
Tomato Chutney:
  1. Heat oil in a pan and add panchphoran. Let the seeds crackle.
  2. Add onions and sauté until translucent.
  3. Stir in ginger-garlic-green chili paste and sauté briefly.

  4. Add tomatoes, then all the spices: red chili powder, coriander powder, black salt, garam masala, sugar, and salt. Mix well.
  5. Add 2 tbsp water, cover, and cook until tomatoes turn soft and mushy.
  6. Stir in ketchup and hot sauce. Add 1 tbsp water if needed.
  7. Mash gently with a presser for smooth chutney consistency.
  8. Finish with cilantro. Keep aside.
Assembly & Garnish:
  1. Just before serving, fry the mini aloo tikkis until golden and crisp.
  2. Place the tikkis on a serving platter.
  3. Add a spoonful of creamy corn white sauce on each tikki.
  4. Top with one spoon of tomato chutney — this is the taste highlighter that ties it all together.
  5. Garnish with pickled onions, red chilies, crushed chips and microgreens! Your Creamy Corn Tiki Bites are ready!

Recipe Video

Recipe Notes

💡 Make-Ahead Party Prep
    •    Tikkis can be shaped a day in advance and refrigerated. Fry on the day of serving.
    •    Creamy corn white sauce can be made a day ahead and gently reheated.
    •    Tomato chutney can also be prepared a day before and warmed.


✨ This makes Creamy Corn Tikki Bites the perfect Diwali appetizer . All the prep can be done in advance — on the day, just fry the tikkis, assemble with corn and chutney, finish with garnishes, and serve hot.

Nutrition Facts
Creamy Corn Tikki Bites
Amount Per Serving
Calories 194 Calories from Fat 81
% Daily Value*
Fat 9g14%
Saturated Fat 4g25%
Trans Fat 0.1g
Polyunsaturated Fat 1g
Monounsaturated Fat 2g
Cholesterol 20mg7%
Sodium 381mg17%
Potassium 504mg14%
Carbohydrates 18g6%
Fiber 3g13%
Sugar 5g6%
Protein 7g14%
Vitamin A 467IU9%
Vitamin C 22mg27%
Calcium 165mg17%
Iron 1mg6%
* Percent Daily Values are based on a 2000 calorie diet.

Subscribe to my YouTube Channel for step-by-step videos.

DID YOU MAKE THIS RECIPE?

Don’t forget to tag @naturallynidhi on Instagram and hashtag it #naturallynidhi. You can also post your pictures to my facebook page.

I’d love to hear how the recipe turned out and what you think in the comment section below. Find me on Instagram Facebook Twitter Pinterest YouTube and share your creation with me!

Rajasthani Govind Gatta Layered Pulao

Rajasthani Govind Gatta Layered Pulao

If you’re looking for a Diwali recipe that doubles as a show-stopping vegetarian centerpiece, this Rajasthani Govind Gatta Layered Pulao is the perfect dish. Inspired by traditional Rajasthani festive recipes, it combines soft besan gattas with a rich mawa and dry fruit filling, simmered in a velvety yogurt gravy, and layered with fragrant basmati rice. Each bite feels celebratory, indulgent, and festive — making it a stunning layered pulao to serve during Diwali or any special occasion! ✨

WATCH HOW TO MAKE RAJASTHANI GOVIND GATTA LAYERED PULAO:

Rajasthani Govind Gatta Layered Pulao

Diwali is always a time when food and family come together to create the warmest memories. Growing up in Jaipur, I remember festive tables filled with gattas in every form — soft, spiced, and comforting. For this Diwali, I wanted to take that classic and reimagine it as a centerpiece that feels both nostalgic and new.

Rajasthani Govind Gatta Layered Pulao

This Rajasthani Govind Gatta Layered Pulao is my festive creation — stuffed besan gattas simmered in a velvety yogurt gravy, then layered with fragrant basmati Rice. It’s regal, indulgent, and truly captures the essence of celebration. ✨

Whether you’re serving it as the star of your Diwali dinner or adding it to a festive thali, this layered pulao is sure to bring joy to your table.

Rajasthani Govind Gatta Layered Pulao

This dish is a celebration in itself — from the soft gattas with a surprise filling to the luxurious gravy and the fragrance of basmati rice, every layer brings comfort and festivity. For me, it’s a way to bring my Jaipur childhood memories to life and share them in a new, creative form with my family today.

May your Diwali be just as fragrant, warm, and full of flavor! ✨

If you like this, please try my other recipes:

5 from 1 vote
Rajasthani Govind Gatta Layered Pulao
Prep Time
30 mins
Cook Time
45 mins
 

This Diwali, make your celebrations extra special with a royal centerpiece — Rajasthani Govind Gatta Layered Pulao. ✨ Soft besan gattas stuffed with a rich mawa and dry fruit filling, simmered in a velvety yogurt-based gravy, and layered with fragrant rice, elevate this festive dish into something truly regal.

Perfect as a vegetarian Diwali recipe, this layered pulao beautifully blends tradition with creativity and is a dish your family and friends will remember.

Course: Dinner, Main Course
Cuisine: Indian
Keyword: festive, party
Custom Category: Dinner, Diwali, Indian Main Course, Main Course, Rice
Servings: 8
Calories: 394 kcal
Author: Nidhi Bothra
Ingredients
Gatta Dough:
Gatta Filling:
  • 1/4 cup mawa , or grated paneer
  • 1 tbsp mixed nuts , finely chopped (I used almonds, cashews, pistachios)
  • 1 tbsp raisins , or figs, finely chopped
  • 2 tsp cilantro , finely chopped
  • pinch salt
  • pinch black pepper
Gravy:
  • 3 tbsp ghee , or oil
  • 1 tsp cumin seeds
  • 1 bay leaves
  • 1 inch cinnamon sticks
  • 2 cloves
  • 1 black cardamom
  • 2 tbsp ginger garlic green chili paste
  • 3 medium onions , boiled and blended to a paste
  • 1 medium tomatoes , pureed
  • 1/2 cup peas , blanched
  • 1/2 cup carrots , chopped and blanched
  • 1 1/2 cups beaten yogurt
  • 1 tsp turmeric powder
  • 3 tsp coriander powder
  • 2 tsp red chili powder
  • salt , to taste
  • 1 tsp garam masala
  • 2 tsp kasoori methi
  • 1/2 cup milk
  • 1 tsp sugar
  • 1 cup water , reserved from boiling gattas, use as needed
Rice:
  • 2 cups rice , soaked for 20 mins
  • 1 tbsp ghee
  • 2 bay leaves
  • 1 inch cinnamon sticks
  • 2 green cardamoms
  • 1 black cardamom
  • 3 cloves
  • 1 inch mace (javitri)
  • 1 star anise
  • 1 tsp salt
  • 6 cups water
Saffron-Kewra Milk:
  • 8-10 strands saffron
  • 1/2 tsp kewra water
  • 1/4 cup milk
Layering:
  • beetroot , shredded
  • cilantro , finely chopped
  • mint leaves , torn
  • fried onions (birista)
Garnish:
  • mixed nuts
  • pomegranate seeds
  • dried rose petals
Instructions
Prepare the Rice:
  1. Prepare rice by adding soaked rice (soak it for 20 mins) to boiling water with all the‬ whole spices (in a spice bag), and salt. Let it cook. When rice is done, drain the water,‬ discard all the whole spice and keep it aside. Make sure that the rice is just done and‬ not too mushy.‬

Prepare the Filling:
  1. Mix together mawa or paneer, nuts, raisins/figs, salt, black pepper, and cilantro. Roll into small balls and keep aside.

Prepare the Gattas:
  1. Combine besan, yogurt, ghee, all the spices, and salt. Add water gradually to make a semi-firm dough.

  2. Take small portions of the dough, flatten slightly, and place a ball of stuffing inside. Seal carefully and roll into smooth balls.

  3. Boil the stuffed gattas in salted water until cooked. Save 1 cup of the cooking water.

  4. Keep 3 gattas aside, to slice in half later for garnish.

Make the Gravy:
  1. Heat ghee/oil in a pan. Add cumin seeds, bay leaf, cloves, cinnamon, black cardamom, and ginger-garlic-green chili paste.

  2. Add boiled onion paste and sauté until aromatic.

  3. Stir in tomato puree.

  4. Add turmeric powder, coriander powder, red chili powder, salt and sugar. Cook for a couple of minutes.

  5. Pour in reserved gatta water (1/4 cup or as needed) to adjust consistency. Cook covered until oil separates.

  6. Reduce flame and whisk in yogurt gradually, stirring continuously.
  7. Add garam masala and kasoori methi. Cook covered for 8-10 minutes until the oil separates.

  8. Gently fold in your gattas and blanched veggies (carrots and peas), add milk and let them cook covered in the gravy for 10-15 minutes. If needed, add the reserved gatta water to adjust consistency. Your gatta curry is ready.

Layer the Pulao:
  1. In a serving dish, spread 1/3 of the cooked rice. Sprinkle beets, mint, cilantro and fried onions. Spoon over the gatta gravy.

  2. Then add another layer of rice with all the garnishes.

  3. Then sprinkle 2 tsp of saffron-kewra milk and add a layer of gatta gravy.

  4. Add the final rice layer.

  5. Slice the 3 reserved gattas into halves and place them on top for a festive finish.
  6. Sprinkle 2 tsp of saffron-kewra milk, and all the garnishes

  7. Finish it off with pomegranate, mixed nuts, rose petals and ghee and your Layered Govind Gatta Pulao is ready!

  8. Warm up in a microwave or oven before serving.

Recipe Video

Recipe Notes
  • If the stuffing for your gattas feels too dry, add 1 tsp milk to bring it together.
  • Always whisk yogurt well before adding to the gravy to avoid curdling.
  • Use reserved gatta water in the gravy for added flavor.
  • Assemble the layering just before serving so the rice stays fluffy and aromatic.
Nutrition Facts
Rajasthani Govind Gatta Layered Pulao
Amount Per Serving
Calories 394 Calories from Fat 117
% Daily Value*
Fat 13g20%
Saturated Fat 7g44%
Trans Fat 0.03g
Polyunsaturated Fat 1g
Monounsaturated Fat 4g
Cholesterol 29mg10%
Sodium 384mg17%
Potassium 474mg14%
Carbohydrates 58g19%
Fiber 4g17%
Sugar 8g9%
Protein 11g22%
Vitamin A 1868IU37%
Vitamin C 12mg15%
Calcium 198mg20%
Iron 2mg11%
* Percent Daily Values are based on a 2000 calorie diet.

Subscribe to my YouTube Channel for step-by-step videos.

DID YOU MAKE THIS RECIPE?

Don’t forget to tag @naturallynidhi on Instagram and hashtag it #naturallynidhi. You can also post your pictures to my facebook page.

I’d love to hear how the recipe turned out and what you think in the comment section below. Find me on Instagram Facebook Twitter Pinterest YouTube and share your creation with me!

Millet Dahi Ke Kabab

Millet Dahi Ke Kabab with Orange-Cilantro Chutney

These Millet Dahi Kababs are a healthy and vrat-friendly Navratri recipe — crispy on the outside, soft and creamy on the inside. Paired with a refreshing Orange-Cilantro Chutney, they’re perfect as a festive snack or appetizer for fasting days.

When it comes to Navratri fasting, variety makes all the difference. Instead of repeating the same few dishes, I love finding creative ways to make fasting food both nourishing and festive. These Millet Dahi Kababs with Orange-Cilantro Chutney are just that — a wholesome snack that feels indulgent while still being completely vrat-friendly.

WATCH HOW TO MAKE MILLET DAHI KE KABAB WITH ORANGE-CILANTRO CHUTNEY:

Millet Dahi Ke Kabab

The kababs are made with kodo millet, strained yogurt, paneer, walnuts, and roasted makhana powder for binding, creating a texture that’s crisp outside and melt-in-the-mouth creamy inside. What takes them to the next level is the refreshing chutney — a unique blend of cilantro, mint, oranges, and cashews that’s tangy, slightly sweet, and cooling.

Whether you’re planning a Navratri thali or looking for a healthy vegetarian appetizer, this recipe fits perfectly. It’s simple to prepare, light on the stomach, and elegant enough to serve for a festive get-together.

Millet Dahi Ke Kabab

✨ Why You’ll Love This Dahi Ke Kababs:

✅  Fasting-friendly and wholesome.

✅  Crispy outside, creamy inside.

✅  Refreshing orange-cilantro chutney adds a tangy twist.

✅  Works as a festive snack or light appetizer

💡 Serving Suggestions:

  • Perfect for Navratri vrat days..
  • A wholesome vegetarian appetizer for parties.
  • Garnish with orange zest or pomegranate seeds for color.

If you like this, please try my other recipes:

5 from 1 vote
Millet Dahi Ke Kabab
Millet Dahi Ke Kabab with Orange-Cilantro Chutney
Prep Time
20 mins
Cook Time
30 mins
 

These Millet Dahi Kebabs are a healthy and vrat-friendly Navratri recipe — crispy on the outside, soft and creamy on the inside. Paired with a refreshing Orange-Cilantro Chutney, they’re perfect as a festive snack or appetizer for fasting days.

Course: Appetizer
Cuisine: Indian
Keyword: fasting
Custom Category: Appetizers, Chutneys & Dips, Fasting Recipes
Servings: 4
Calories: 207 kcal
Author: Nidhi Bothra
Ingredients
Dahi Ke Kabab:
  • 1/2 cup millet soaked 6 hrs, cooked on low flame, cooled, I used kodo millet
  • 1/2 cup hung curd
  • 1/2 cup paneer , crumbled
  • 1/4-1/2 cup roasted makhana powder , as needed for binding
  • 3 tbsp walnuts , very finely chopped
  • 1 tsp ginger-green chilli paste
  • 1 tbsp cilantro , finely chopped
  • 1 tsp salt , sendha namak, to taste
  • 1 tsp roasted cumin powder
  • 1/2 tsp black pepper
  • 1/2 tsp cardamom powder
  • pinch sugar
  • ghee , or oil for shallow frying
Orange-Cilantro Chutney:
  • 1 cup cilantro with tender stems
  • 1/2 cup mint leaves
  • 2 small oranges , segments only
  • 2 green chilies
  • 1/2 inch ginger
  • 7-8 cashews
  • 2/3 tsp salt , sendha namak
  • 1/4 tsp sugar
  • 1 tsp cumin seeds
  • ice cubes , to blend fresh and green
Instructions
  1. Cook the Millet: Wash and soak millet for 6 hours. Cook on low flame until soft and fluffy. Let it cool and refrigerate. I used kodo millet, but you can use any millet of your choice.

  2. Prepare the Mixture: In a mixing bowl, add cooked millet, hung curd, paneer, walnuts, ginger-green chili paste, cilantro, salt, cumin, black pepper, cardamom powder, and sugar.

  3. Slowly add roasted makhana powder until mixture binds. Refrigerate for 10–15 minutes.

  4. Shape & Cook: Shape into small kababs. Pan-fry in ghee/oil until golden — crispy outside, creamy inside.

  5. Make the Chutney: Blend cilantro, mint, orange, chilies, ginger, cashews, cumin, salt, sugar, and ice cubes until smooth.

  6. Serve: Serve hot kababs with chutney. Garnish with herbs or pomegranate for a festive touch.

Recipe Video

Nutrition Facts
Millet Dahi Ke Kabab with Orange-Cilantro Chutney
Amount Per Serving
Calories 207 Calories from Fat 126
% Daily Value*
Fat 14g22%
Saturated Fat 5g31%
Polyunsaturated Fat 4g
Monounsaturated Fat 1g
Cholesterol 20mg7%
Sodium 1068mg46%
Potassium 218mg6%
Carbohydrates 13g4%
Fiber 3g13%
Sugar 7g8%
Protein 9g18%
Vitamin A 656IU13%
Vitamin C 31mg38%
Calcium 224mg22%
Iron 2mg11%
* Percent Daily Values are based on a 2000 calorie diet.

Subscribe to my YouTube Channel for step-by-step videos.

DID YOU MAKE THIS RECIPE?

Don’t forget to tag @naturallynidhi on Instagram and hashtag it #naturallynidhi. You can also post your pictures to my facebook page.

I’d love to hear how the recipe turned out and what you think in the comment section below. Find me on Instagram Facebook Twitter Pinterest YouTube and share your creation with me!

Fruit & Nut Makhana Chaat

Fruit & Nut Makhana Chaat

Looking for a quick and healthy recipe for Navratri fasting or Ekadashi vrat? This Fruit & Nut Makhana Chaat is the perfect vrat-friendly chaat recipe — light, colorful, and so satisfying. With crispy roasted makhana, a creamy yogurt base, fresh fruits and vegetables, plus a crunchy topping of nuts and seeds, it’s a wholesome chaat that comes together in minutes.

WATCH HOW TO MAKE FRUIT & NUT MAKHANA CHAAT:


Fruit & Nut Makhana Chaat

This snack is not only filling and nutritious but also festive enough to serve during Navratri celebrations, Diwali gatherings, or as a healthy evening snack. If you’re searching for healthy Indian snacks, quick fasting recipes, or fruit and nut chaats, this one bowl has it all.

✨ Why You’ll Love This Makhana Chaat:

Vrat-Friendly – made with fasting ingredients and spices roasted cumin (bhuna jeera), black pepper, and sendha namak.

Healthy & Wholesome – loaded with fruits, nuts, and protein-rich yogurt.

Quick & Easy – no prep, just simple assembling in under 15 minutes.

Festive & Colorful – perfect for Navratri, Diwali or any special occasion.

Fruit & Nut Makhana Chaat

🌟 Tips & Variations:

  • Use sweet potatoes instead of regular potatoes for a healthier twist.
  • Roast makhana just before serving so they stay crunchy.
  • Adjust chutney spice level depending on your fasting preference.
  • Add seasonal fruits like apples, pears, or grapes for variety

💡 Serving Suggestions:

This Makhana Fruit & Nut Chaat makes a perfect fasting meal, healthy evening snack, or festive starter. Serve chilled in small bowls for parties, or as a light meal in Navratri thalis.

If you like this, please try my other recipes:

5 from 2 votes
Fruit & Nut Makhana Chaat
Prep Time
20 mins
Total Time
20 mins
 

This Fruit & Nut Makhana Chaat is all about crunch, freshness, and flavor in every bite. Crispy air-fried makhana topped with a sweet and spicy yogurt base, juicy fruits, crispy potatoes, and a generous sprinkle of nuts, seeds, and pomegranate. 💛

It’s the perfect balance — healthy, festive, and ready in just minutes. Perfect for Navratri fasting days or anytime you’re craving something light yet satisfying. 🌸

Course: Appetizer, Lunch, Snack
Cuisine: Indian
Keyword: fasting
Custom Category: Appetizers, Chaat (Indian Street Food), Fasting Recipes, Healthy, Lunch, Snacks
Servings: 4
Calories: 284 kcal
Author: Nidhi Bothra
Ingredients
Base:
  • 2 cups phool makhana (puffed lotus seeds)
  • 2 tsp ghee
  • salt , to taste
Sweet & Spicy Yogurt:
  • 1 1/2 cups yogurt , chilled
  • 1/2 tsp salt , sendha namak, adjust to taste
  • 1 tsp sugar
  • 2 tbsp mint cilantro chutney
Toppings:
  • 1 cup watermelon , cubed
  • 1 medium cucumber , diced
  • 1/2 cup cherry tomatoes , halved
  • 1 medium potatoes , chopped and air-fried/baked with little oil, salt, and pepper
Crunch:
  • 1/4 cup mixed nuts , almonds, pistachios, cashews, etc.
  • 1 tbsp pumpkin seeds
  • 1 tbsp melon seeds (magaz)
  • 1/4 cup pomegranate seeds
Spice Sprinkle:
  • 1 tsp roasted cumin powder
  • 1/4 tsp black pepper
  • salt , to taste
Garnish:
  • mint cilantro chutney , for drizzle
  • cilantro , finely chopped
  • mint leaves
Instructions
  1. Roast the Makhana: Toss makhana with oil or ghee. Air-fry at 180°C (350°F) for 6–7 minutes until crunchy. (You can also roast them in a pan or oven.)

  2. Prepare the Sweet & Spicy Yogurt: Whisk chilled yogurt until smooth. Add salt, sugar, and green chutney. Mix into a creamy, tangy base.

  3. Assemble the Chaat: In a serving bowl, spread the toasted makhana. Add a generous layer of sweet & spicy yogurt. Top with watermelon, cucumber, cherry tomatoes, and crispy potato cubes.

  4. Add Crunch & Spices: Sprinkle mixed nuts, pumpkin seeds, melon seeds, and pomegranate. Finish with salt to taste, roasted cumin powder, and black pepper.

  5. Garnish & Serve: Drizzle more chutney on top. Garnish with fresh cilantro and mint leaves.

  6. Serve immediately for the best crunch.

Recipe Video

Recipe Notes
  • Use sweet potatoes instead of regular potatoes for a healthier twist.
  • Roast makhana just before serving so they stay crunchy.
  • Adjust chutney spice level depending on your fasting preference.
  • Add seasonal fruits like apples, pears, or grapes for variety.
Nutrition Facts
Fruit & Nut Makhana Chaat
Amount Per Serving
Calories 284 Calories from Fat 99
% Daily Value*
Fat 11g17%
Saturated Fat 4g25%
Trans Fat 0.003g
Polyunsaturated Fat 2g
Monounsaturated Fat 5g
Cholesterol 12mg4%
Sodium 495mg22%
Potassium 918mg26%
Carbohydrates 37g12%
Fiber 3g13%
Sugar 13g14%
Protein 12g24%
Vitamin A 608IU12%
Vitamin C 23mg28%
Calcium 226mg23%
Iron 2mg11%
* Percent Daily Values are based on a 2000 calorie diet.

Subscribe to my YouTube Channel for step-by-step videos.

DID YOU MAKE THIS RECIPE?

Don’t forget to tag @naturallynidhi on Instagram and hashtag it #naturallynidhi. You can also post your pictures to my facebook page.

I’d love to hear how the recipe turned out and what you think in the comment section below. Find me on Instagram Facebook Twitter Pinterest YouTube and share your creation with me!

Cucumber Millet Thalipeeth

Cucumber Millet Thalipeeth

This Cucumber Millet Thalipeeth is a wholesome, crispy, and nourishing dish made with millet, cucumber, and sweet potato. It’s light enough for vrat days yet hearty enough to keep you full and energized. Served with makhana fruit shrikhand and a roasted tomato chutney, it’s festive, healthy, and absolutely delicious.

WATCH HOW TO MAKE CUCUMBER MILLET THALIPEETH:

Cucumber Millet Thalipeeth

Fasting during Navratri doesn’t have to be plain, predictable, or repetitive — with the right ingredients, vrat recipes can be light, nourishing, and full of flavour. Millets are naturally gluten-free, high in fiber, and keep you full for longer, making them an excellent choice during fasting. Cucumber adds freshness and hydration, while sweet potato provides natural starch and energy. Together, they create a wholesome base that is both delicious and sustaining.

Why You’ll Love This Recipe:

Perfect for fasting – made with millet, cucumber, sweet potato, peanuts, and paneer/chenna — all vrat-friendly ingredients.

Healthy & nourishing – packed with fiber, protein, and good fats.

Crispy & flavorful – cooked low and slow on ghee for a golden finish.

Easy & versatile – no fermentation, minimal prep, and millet of your choice works.

Cucumber Millet Thalipeeth

Tips & Variations:

🥒 Squeeze Cucumber Well – always remove excess water in a muslin cloth, otherwise the dough will turn soggy.

🍠 Sweet Potato Rinse – washing grated sweet potato in cold water adds crunch and starch for binding.

🍃 Banana Leaf Option – pressing on banana leaf adds aroma, but parchment works well too.

🌾 Millet Choice – I used little millet , but barnyard, kodo, or foxtail millet can also be used as they all work well.

🔥 Cook Low & Slow – be patient; the thalipeeth cooks evenly and turns golden when done on medium-low heat.

Serving Suggestions:

🍽️ Serve as part of a Navratri thali with aloo sabzi, sabudana kheer, and fruit salad.

🥣 Pair with yogurt, green chutney, roasted tomato chutney or makhana fruit shrikhand for a light vrat meal.

☕️ Enjoy as a wholesome snack with tea.

If you like this, please try my other recipes:

5 from 2 votes
Cucumber Millet Thalipeeth
Prep Time
20 mins
Cook Time
30 mins
 

This Cucumber Millet Thalipeeth is a wholesome healthy, crispy, and nourishing dish made with millet, cucumber, and sweet potato. It’s light enough for vrat days yet hearty enough to keep you full and energized. Served with makhana fruit shrikhand and a vrat-friendly roasted tomato chutney, it’s festive, healthy, and absolutely delicious.

Course: Dinner, Lunch, Main Course
Cuisine: Indian
Keyword: fasting
Custom Category: Dinner, Fasting Recipes, Indian Main Course, Lunch, Main Course
Servings: 4
Calories: 284 kcal
Author: Nidhi Bothra
Ingredients
  • 3 cucumbers , grated (squeezed in muslin cloth to remove water)
  • 1 medium sweet potatoes , or regular potato, grated, washed in ice-cold water & squeezed
  • 1 cup cooked millets , I used little millet, but any millet works
  • 1/2 cup cottage cheese (chenna) or paneer , grated or crumbled
  • 1/4 cup peanuts , corsely crushed
  • 1/4 cup grated coconut , fresh or frozen
  • 2 tsp ginger green chili paste
  • 1 tsp roasted cumin powder
  • 1/2 tsp black pepper
  • salt , to taste (use sendha namak for fasting)
  • pinch sugar , optional
  • 1/2 - 3/4 cup millet flour , any millet flour works; add gradually for binding
  • 2 tsp lemon juice
  • 2 tbsp cilantro , finely chopped
  • ghee , or oil for cooking
Instructions
  1. Prep the Cucumber: Grate cucumbers and squeeze out all excess water in a muslin cloth until almost dry. This is essential so the dough doesn’t turn watery.

  2. Prep the Sweet Potato: Grate sweet potato (or regular potato), wash once in ice-cold water, then squeeze well. This step adds starch and a light crunch to the thalipeeth.

  3. Mix the Base: In a large bowl, combine squeezed cucumber, squeezed sweet potato, and all the other ingredients except millet flour, lemon juice and cilantro. Mix well.

  4. Make the Dough (No Water): Add millet flour gradually (¼–¾ cup) until the mixture holds together as a soft dough (not sticky, not wet). Finish with lemon juice and finely chopped cilantro. Mix to combine.

  5. Shape the Thalipeeth: Lightly grease a banana leaf (or parchment paper). Divide dough into 6–8 portions. Place one portion on the leaf and press evenly into a round (about ½–¾ cm thick). Repeat.

  6. Cook Low and Slow: Heat a tawa on medium to low flame. Transfer one pressed thalipeeth onto the hot tawa. Make a small hole in the center on the tawa, then add ghee in the middle and around the edges. Cook low and slow until the bottom turns golden and crisp, then flip carefully and cook the other side until done. Repeat with remaining portions.

  7. Serve hot with makhana fruit shrikhand and a vrat-friendly roasted tomato chutney.

Recipe Video

Recipe Notes
  • Muslin squeeze for cucumber prevents a watery dough and helps crisping.
  • Cold-water wash for sweet potato adds starch and a light crunch.
  • Center hole with ghee helps the middle cook evenly and brown beautifully.
  • Banana leaf adds aroma, but parchment paper works just as well.
Nutrition Facts
Cucumber Millet Thalipeeth
Amount Per Serving
Calories 284 Calories from Fat 90
% Daily Value*
Fat 10g15%
Saturated Fat 4g25%
Polyunsaturated Fat 2g
Monounsaturated Fat 2g
Cholesterol 2mg1%
Sodium 148mg6%
Potassium 700mg20%
Carbohydrates 40g13%
Fiber 7g29%
Sugar 7g8%
Protein 11g22%
Vitamin A 8201IU164%
Vitamin C 10mg12%
Calcium 92mg9%
Iron 3mg17%
* Percent Daily Values are based on a 2000 calorie diet.

Subscribe to my YouTube Channel for step-by-step videos.

DID YOU MAKE THIS RECIPE?

Don’t forget to tag @naturallynidhi on Instagram and hashtag it #naturallynidhi. You can also post your pictures to my facebook page.

I’d love to hear how the recipe turned out and what you think in the comment section below. Find me on Instagram Facebook Twitter Pinterest YouTube and share your creation with me!

Apple Sabudana Kheer

Apple Sabudana Kheer

Apple Sabudana Kheer – it’s Navratri, so let’s give the classic sabudana kheer a new twist! 🍎 With the crunch of apples, the richness of caramel, and the soft texture of sabudana, in just 15 minutes, this fasting-friendly vrat favorite transforms into something fresh, festive, and perfect to share. 🌸✨

WATCH HOW TO MAKE APPLE SABUDANA KHEER:

Apple Sabudana Kheer

Navratri fasting always brings with it so many nostalgic and comforting recipes, and sabudana kheer has always been one of those vrat staples that feels wholesome yet indulgent. This year, I wanted to give it a little festive twist — by adding apples that bring a beautiful crunch and caramel sweetness, making the kheer creamy yet refreshing. Perfect for fasting or any festive celebration!

Apple Sabudana Kheer

Tips & Variations:

Soaking Sabudana – Use very little water for soaking so the pearls don’t turn mushy.

🍯 Sweetener Options – You can use jaggery instead of sugar for a deeper flavor.

🍎 Texture Control – Keep apples slightly firm for bite — don’t overcook them.

🌱 Vegan Option – Replace ghee with coconut oil and milk with almond or coconut milk.

If you like this, please try my other recipes:

5 from 1 vote
Apple Sabudana Kheer
Cook Time
15 mins
Total Time
15 mins
 

Apple Sabudana Kheer - let’s give the classic sabudana kheer a new twist! 🍎 With the crunch of apples, the richness of caramel, and the soft texture of sabudana, in just 15 minutes, this fasting-friendly navratri vrat favorite transforms into something fresh, festive, and perfect to share. 🌸✨

Course: Dessert
Cuisine: Fusion, Indian
Keyword: fasting
Custom Category: Desserts, Fasting Recipes, Fusion, Indian Sweets
Servings: 6
Calories: 292 kcal
Author: Nidhi Bothra
Ingredients
  • 1/2 cup sabudana (tapioca or sago pearls)
  • 5 cups milk
  • 3 tsp ghee , divided
  • 2 medium apple , finely chopped
  • 1/2 cup sugar , adjusted to taste
  • 3 tbsp water , for apples
  • 3 tbsp mixed nuts , I used cashew, almonds, pistachios
  • 1/2 tsp cardamom powder
  • 8-10 strands saffron , soaked in 2 tsp water
Instructions
  1. Soak the Sabudana: Rinse sabudana pearls in cold water 3-4 times until the water is clear and all the starch is rinsed off. Soak them in a bowl for 3 to 4 hours with enough water to just cover them. They will absorb water and double in size. Once soaked, press them and check that they are not hard from inside. Now, drain them and if they are too wet, spread them on a kitchen towel until they are completely dry.

  2. Toast the Nuts: In a pan, heat 1 tsp ghee and roast the mixed nuts until golden. Remove and keep aside.

  3. Saute Sabudana: In the same pan, add 1 tsp ghee and sauté the soaked sabudana for 1–2 minutes. This step helps coat the sabudana so the kheer doesn’t curdle or stick.

  4. Add Milk: Add milk, stir continuously till it comes to a boil, then let it simmer on medium-low heat for 5 mins. Don't overcook otherwise the sabudana will become mushy.

  5. Prepare the Apples: Meanwhile, in another pan, sauté the chopped apples in 1 tsp ghee. Add a splash of water, cover, and cook till slightly soft (not mushy). Add sugar and cook for 3–4 minutes until the apples turn glossy and lightly caramelized.

  6. Combine & Finish: Add the apple mixture to the simmering sabudana. Stir in cardamom powder, saffron, and the toasted nuts. Simmer for a minute and the Apple Subudana Kheer is ready!

  7. Serve: Garnish with extra apples & nuts, and serve warm or chilled.

Recipe Video

Nutrition Facts
Apple Sabudana Kheer
Amount Per Serving
Calories 292 Calories from Fat 81
% Daily Value*
Fat 9g14%
Saturated Fat 4g25%
Trans Fat 0.2g
Polyunsaturated Fat 1g
Monounsaturated Fat 3g
Cholesterol 22mg7%
Sodium 113mg5%
Potassium 395mg11%
Carbohydrates 47g16%
Fiber 3g13%
Sugar 33g37%
Protein 8g16%
Vitamin A 241IU5%
Vitamin C 5mg6%
Calcium 246mg25%
Iron 0.5mg3%
* Percent Daily Values are based on a 2000 calorie diet.

Subscribe to my YouTube Channel for step-by-step videos.

DID YOU MAKE THIS RECIPE?

Don’t forget to tag @naturallynidhi on Instagram and hashtag it #naturallynidhi. You can also post your pictures to my facebook page.

I’d love to hear how the recipe turned out and what you think in the comment section below. Find me on Instagram Facebook Twitter Pinterest YouTube and share your creation with me!

Idli Shakshuka

Herbed Idli Shakshuka

This Herbed Idli Shakshuka is a vegetarian Indian fusion recipe where soft idli batter is cooked in a spiced tomato–bell pepper base, finished with herbs, feta, olives, and ghee. Perfect for brunch or serve them individually as an appetizer at your next party!

WATCH HOW TO MAKE HERBED IDLI SHAKSHUKA:

Idli Shakshuka

Shakshuka is a classic Middle Eastern dish, celebrated for its vibrant tomato base and aromatic spices. In my kitchen, I love reimagining such global favorites with an Indian touch. This Herbed Idli Shakshuka does just that — soft idli batter is spooned directly into the simmering masala base, puffing up into pillowy bites as it cooks.

Idli Shakshuka

The result is a dish that’s cozy yet refreshing, with smoky paprika, warm spices, fresh herbs, and a final drizzle of ghee. Feta adds a creamy tang, making this fusion recipe a perfect balance of comfort and flair. Serve it for brunch, weeknight dinners, or as a showstopper at your next gathering.

Idli Shakshuka

Tips & Variations:

🌿 Make it vegan – Skip the feta and drizzle with extra virgin olive oil instead of ghee.

🌶️ Spice it up – Add green chilies with garlic for extra heat.

🥗 Prep ahead – The tomato–pepper base can be made a day in advance; just add batter and make the idles before serving.

💡 Serving idea – Pair with naan, crusty bread, or enjoy as a one-pot meal.

If you like this, please try my other recipes:

5 from 1 vote
Idli Shakshuka
Herbed Idli Shakshuka
Prep Time
10 mins
Cook Time
20 mins
 

Herbed Idli Shakshuka - a fresh twist on a classic 🌿✨, this idli shakshuka brings together a spiced tomato–bell pepper base with soft idli batter that cooks right into the sauce. Topped with feta, herbs, olives and ghee — it’s fusion comfort at its best 💛 Perfect for brunch or serve them individually as an appetizer at your next party!

Course: Appetizer, Breakfast, Lunch
Cuisine: Indian, Mediterranean
Keyword: fusion
Custom Category: Appetizers, Breakfast, Fusion, International Cuisine, Lunch
Servings: 4
Calories: 172 kcal
Author: Nidhi Bothra
Ingredients
Shakshuka:
  • 2 tbsp ghee , or oil
  • 1 cup onions , finely chopped
  • 3-4 cloves garlic , finely chopped
  • 2 tbsp cilantro with tender stems , finely chopped
  • 2 cups tomatoes , finely chopped
  • 1/2 cup tomato puree , fresh or canned
  • 2 tsp harissa paste , or use kashmiri chili paste
  • 1/2 tsp turmeric powder
  • 1/2 tsp red chili powder
  • 1 tsp coriander powder
  • 1/2 tsp smoked paprika
  • 1/2 tsp garam masala
  • 2 tbsp water , as needed
  • 1 cup mixed color bell peppers , finely chopped
  • 1/2 tsp sugar
  • salt , to taste
Idli:
  • 2 cups idli batter , for plain idli or ragi idli
  • 1/2 cup water , for the idlis to cook
Finishing:
  • 1/2 tsp oregano
  • 1/4 cup cilantro , finely chopped
  • 2 tbsp parsley , finely chopped
  • 3 tbsp feta cheese , crumbled
  • 1 tsp ghee , to drizzle
  • olives , finely chopped
Instructions
  1. Sauté Aromatics: Heat oil or ghee in a wide pan. Add onions, garlic, and cilantro stems. Sauté until translucent.

  2. Build the Tomato Base: Add chopped tomatoes and tomato purée. Stir in turmeric, chili powder, coriander powder, smoked paprika, harissa paste (or kashmiri red chili paste), garam masala, sugar, and salt. Add a splash of water, cover, and cook for 5-6 minutes until the tomatoes soften.

  3. Add Bell Peppers: Stir in chopped bell peppers and sauté 2–3 minutes.

  4. Add Idli batter: Pour in ½ cup water to loosen the base. Create small wells in the sauce and spoon in the idli batter.

  5. Steam the Idlis: Cover and cook on medium-low heat for 12–15 minutes, until the idli batter puffs up and cooks through in the sauce.

  6. Finish & Serve: Sprinkle garam masala, oregano, fresh cilantro, and parsley. Before serving, drizzle ghee, crumble feta cheese and olives on top.

Recipe Video

Recipe Notes
  • Use Ragi Idli: To make the ragi idli batter, see my Ragi Dosa recipe.
  • Make it vegan: Skip the feta and drizzle with extra virgin olive oil instead of ghee.
  • Spice it up: Add green chilies with garlic for extra heat.
  • Prep ahead: The tomato–pepper base can be made a day in advance; just add batter and make the idlis before serving.
  • Serving idea: Pair with naan, crusty bread, or enjoy as a one-pot meal.
Nutrition Facts
Herbed Idli Shakshuka
Amount Per Serving
Calories 172 Calories from Fat 108
% Daily Value*
Fat 12g18%
Saturated Fat 7g44%
Polyunsaturated Fat 1g
Monounsaturated Fat 3g
Cholesterol 34mg11%
Sodium 203mg9%
Potassium 509mg15%
Carbohydrates 14g5%
Fiber 3g13%
Sugar 7g8%
Protein 4g8%
Vitamin A 1450IU29%
Vitamin C 51mg62%
Calcium 105mg11%
Iron 2mg11%
* Percent Daily Values are based on a 2000 calorie diet.

Subscribe to my YouTube Channel for step-by-step videos.

DID YOU MAKE THIS RECIPE?

Don’t forget to tag @naturallynidhi on Instagram and hashtag it #naturallynidhi. You can also post your pictures to my facebook page.

I’d love to hear how the recipe turned out and what you think in the comment section below. Find me on Instagram Facebook Twitter Pinterest YouTube and share your creation with me!

Layered Lemon Rice Cups

Layered Lemon Rice Cups

There’s something so comforting about lemon rice — the bright yellow color, the tangy citrus kick, and that nutty crunch from the tadka. But today, I wanted to take this everyday favorite a step further and turn it into something a little more festive, fun, and layered — a modern take on a traditional favorite!

WATCH HOW TO MAKE LAYERED LEMON RICE CUPS:

Layered Lemon Rice Cups

These Layered Lemon Rice Cups are a three-part celebration on a plate: a base of fresh and zesty lemon rice, a fragrant coconut veggie layer with roasted potatoes and paneer, and a refreshing moong dal kosambari salad on top. Garnished with beetroot raita, papad, and boondi, every spoonful brings together tangy, spicy, crunchy, and cooling flavors in perfect harmony.

Layered Lemon Rice Cups

It’s a recipe that looks vibrant, tastes wholesome, and is versatile enough for festivals, family get-togethers, or even as a fun weeknight dinner idea. Easy to prepare in layers and assemble, it’s a dish that will impress your guests just as much as it satisfies your craving for comfort food.

Layered Lemon Rice Cups

Why You’ll Love These Lemon Rice Cups:

A modern take on tradition – Lemon rice is a classic comfort dish, but here it’s reimagined in colorful layers that make it extra special.

🥗 Three layers of flavor – Tangy lemon rice, a hearty coconut veggie mix, and a refreshing moong dal kosambari salad come together for the perfect balance.

🌿 Wholesome and versatile – With rice, vegetables, dal, and salad all in one, these cups are a complete meal that works for picnics, parties, or weeknight dinners.

💛 Beautiful presentation – Served in clear cups, each layer shines through — making this recipe just as pretty to look at as it is satisfying to eat.

Tips & Variations:

🌿 Prep ahead – Cook the rice and soak the dal in advance. Keep each layer stored separately in the fridge, then assemble just before serving.

🍋 Swap the veggies – Use whatever vegetables are in season. Bell peppers, peas, zucchini, or broccoli all work beautifully in the coconut veggie layer.

🥥 Adjust the spice – The fresh masala can be made milder or spicier depending on your preference. Reduce green chilies for a gentle heat or add an extra one for more punch.

🥗 Make it lighter – Skip the boondi and papad garnish if you prefer a lighter finish, or serve them on the side so everyone can add their own crunch.

💡 Serving idea – These look especially pretty in clear cups or jars where each layer shows through. They’re perfect for picnics, potlucks, or even as a festive centerpiece dish.

If you like this, please try my other recipes:

5 from 1 vote
Layered Lemon Rice Cups
Prep Time
20 mins
Cook Time
40 mins
 

Layered Lemon Rice Cups - a vibrant, wholesome recipe with three colorful layers — lemon rice, a coconut veggie mix, and a refreshing crunchy moong dal kosambir salad. Perfectly finished with raita, papad, boondi, and mint!

Course: Dinner, Lunch, Main Course
Cuisine: Indian
Keyword: party
Custom Category: Dinner, Indian Main Course, Lunch, Main Course, Rice
Servings: 12 cups
Calories: 239 kcal
Author: Nidhi Bothra
Ingredients
Layer 1 – Lemon Rice:
  • 4 cups cooked rice , cooled
  • 2 1/2 tbsp ghee , or oil
  • 1 tsp mustard seeds
  • 1 tsp split white urad dal (split matpe beans)
  • 2-3 green chilies
  • 2-3 dried red chilies
  • 2 sprigs curry leaves
  • 4 tbsp roasted peanuts
  • 8-10 pcs cashews
  • 3 tbsp lemon juice
  • 1 tsp turmeric powder
  • 1/4 tsp sugar , just a pinch
  • salt , to taste
  • 2 tbsp cilantro , finely chopped
Layer 2 – Coconut Veggie Layer:
  • 2 tbsp ghee , or oil
  • 1 tsp cumin seeds
  • 1 big potatoes , cubed, or use 2 medium
  • 1/2 cup paneer , cubed
  • 2 cups mixed vegetables , blanched & ice-bathed, I used carrot, beans, corn, cauliflower.
  • 1/2 cup tomatoes , finely chopped
  • 2 tbsp freshly ground coconut masala in mortar & pestle grind: 2 tbsp coconut, 1-inch ginger, 2 green chilies, 2 garlic cloves, 1 tsp cumin seeds, 2 tsp coriander seeds, 1/2 tsp fennel seeds
  • 1/2 tsp turmeric powder
  • 1/2 tsp garam masala
  • 1 tsp red chili powder
  • 1 tsp mango powder (amchur)
  • salt , to taste
  • 2 tbsp cilantro , finely chopped for garnish
Layer 3 – Moong Dal Kosambari Salad:
  • 1/2 cup yellow moong dal (petite split yellow lentils) , soaked for 3-4 hours
  • 1/2 cup pomegranate seeds
  • 2 tbsp shredded coconut , fresh or frozen
  • 1 tbsp cilantro with tender stems , finely chopped
  • 2 tsp green chilies , finely chopped
  • 1 tbsp lemon juice
  • salt , to taste
  • tadka , with 2 tsp oil, 1/2 tsp mustard seeds, 1/4 tsp cumin seeds, 2-3 sprigs curry leaves
Garnish:
Instructions
Layer 1 – Lemon Rice:
  1. Heat oil in a pan. Add mustard seeds, urad dal, green chilies, red chilies, curry leaves, peanuts, and cashews. Sauté until golden.

  2. Lower the flame completely and add turmeric. Stir quickly.

    Tip: Add turmeric when the oil is slightly cool so the color stays bright yellow.

  3. Add rice, lemon juice, salt, sugar, and mix gently.

  4. Finish with cilantro.
Layer 2 – Coconut Veggie Layer:
  1. Heat oil, add cumin seeds, then potatoes. Sprinkle salt, cover, and cook until 3/4 done.

  2. Add paneer cubes, sauté until golden.
  3. Stir in the blanched mixed vegetables, tomatoes, freshly ground coconut masala, and all dry masalas.
  4. Sauté for 3–4 minutes on medium flame. Add a splash of water to bring it together.
  5. Garnish with cilantro.
Layer 3 – Moong Dal Kosambari Salad:
  1. In a bowl, combine soaked moong dal, pomegranate, coconut, cilantro, green chilies, lemon juice, and salt.
  2. Prepare tadka: heat oil, add mustard seeds, cumin, curry leaves until they splutter. Pour over salad and mix.
Assembly:
  1. Place lemon rice at the base of cups.
  2. Add the coconut veggie layer.
  3. Top with moong dal koshimbir.
  4. Garnish with beetroot raita, boondi, papad, and mint.
  5. ✨ Your Layered Lemon Rice Cups are ready — colorful, fresh, and festive!

Recipe Video

Recipe Notes
  • 🌿 Prep ahead – Cook the rice  and soak the dal in advance. Keep each layer stored separately in the fridge, then assemble just before serving.
  • 🍋 Swap the veggies – Use whatever vegetables are in season. Bell peppers, peas, zucchini, or broccoli all work beautifully in the coconut veggie layer.
  • 🥥 Adjust the spice – The fresh masala can be made milder or spicier depending on your preference. Reduce green chilies for a gentle heat or add an extra one for more punch.
  • 🥗 Make it lighter – Skip the boondi and papad garnish if you prefer a lighter finish, or serve them on the side so everyone can add their own crunch.
  • 💡 Serving idea – These look especially pretty in clear cups or jars where each layer shows through. They’re perfect for picnics, potlucks, or even as a festive centerpiece dish.
Nutrition Facts
Layered Lemon Rice Cups
Amount Per Serving
Calories 239 Calories from Fat 99
% Daily Value*
Fat 11g17%
Saturated Fat 6g38%
Polyunsaturated Fat 1g
Monounsaturated Fat 3g
Cholesterol 21mg7%
Sodium 70mg3%
Potassium 247mg7%
Carbohydrates 29g10%
Fiber 5g21%
Sugar 3g3%
Protein 7g14%
Vitamin A 1693IU34%
Vitamin C 15mg18%
Calcium 73mg7%
Iron 1mg6%
* Percent Daily Values are based on a 2000 calorie diet.

Subscribe to my YouTube Channel for step-by-step videos.

DID YOU MAKE THIS RECIPE?

Don’t forget to tag @naturallynidhi on Instagram and hashtag it #naturallynidhi. You can also post your pictures to my facebook page.

I’d love to hear how the recipe turned out and what you think in the comment section below. Find me on Instagram Facebook Twitter Pinterest YouTube and share your creation with me!

Tofu Tikka Masala

Tofu Tikka Masala

If you love flavorful Indian curries but want something healthy and protein-packed, this Tofu Tikka Masala is the perfect recipe. It’s a creamy, smoky, and comforting dish made with marinated tofu cubes simmered in a rich tomato-based curry — all without using heavy cream.

WATCH HOW TO MAKE TOFU TIKKA MASALA:

Tofu Tikka Masala

This recipe is high in protein, completely vegetarian, and easy enough for weeknight dinners, yet impressive enough for special occasions. Pair it with masala missi roti, naan, or simple steamed rice, and you’ll have a cozy Indian meal that everyone will love.

Unlike many restaurant-style curries that use cream, this gravy gets its silky texture from roasted makhana (fox nuts) and cashews, blended with tomatoes for a natural creaminess.

Instead of paneer, I use extra-firm tofu, which is packed with protein and soaks up all the flavors beautifully once pressed and marinated. The tofu is first marinated in yogurt and spices, then grilled or air-fried for that authentic smoky char, and finally finished with dhungar (a quick coal-smoking technique) for the signature tandoori aroma.

Tofu Tikka Masala

Whether you’re vegetarian or simply looking for a new tofu curry recipe to add to your weekly rotation, this dish ticks all the boxes.

Why You’ll Love This Tofu Tikka Masala:

High Protein Vegetarian Meal – Extra-firm tofu is rich in plant-based protein, making this a wholesome and filling curry.
Creamy Without Cream – Blended tomatoes, roasted makhana, and cashews create a restaurant-style curry without heavy cream.
Authentic Indian Flavors – Yogurt marinade, kasuri methi, and the smoky dhungar technique bring classic North Indian flavors.
Easy to Cook – Simple steps, pantry spices, and multiple cooking options (stovetop, oven, air fryer).
Versatile – Pairs perfectly with roti, naan, missi roti, or rice.

Cooking the Tofu:

Traditionally, I like to roast the tofu skewers directly over the gas flame for that authentic smoky char. But you can also make it more convenient:

Oven Method – Arrange the marinated tofu cubes with peppers and onions on skewers or a lined tray. Bake at 370°F (190°C) for 10–15 minutes, brushing with a little oil midway.

Air Fryer Method – Place the marinated tofu in the basket and air fry at 350°F (175°C) for 10 minutes, checking halfway through and brushing lightly with oil for even roasting.

Both methods dry the marinade slightly and give the tofu a nice roasted flavor, making them great alternatives to grilling on the flame.

Pro Tips for the Best Tofu Tikka Masala:

  • Press the Tofu is Key – Don’t skip pressing the tofu. It ensures the cubes are firm, absorb the marinade deeply, and hold well on skewers.
  • Balance the Heat – Kashmiri red chili gives color without much spice. Adjust with regular red chili if you prefer more heat.
  • Make it Vegan – Use dairy-free yogurt, ,plant-based milk and oil for a completely vegan tikka masala.
  • Meal Prep Friendly – The gravy can be made 2–3 days ahead; just grill tofu fresh before serving.

Serving Suggestions:

Serve this Tofu Tikka Masala curry with:

  • Masala missi roti or whole wheat parathas for a rustic Indian meal
  • Jeera rice or simple steamed basmati rice
  • Naan or kulcha for a restaurant-style pairing
  • A side of plain yogurt or raita to balance the flavors

If you like this, please try my other recipes:

5 from 1 vote
Tofu Tikka Masala
Tofu Tikka Masala
Prep Time
20 mins
Cook Time
30 mins
 

Tofu Tikka Masala - this smoky and creamy Tofu Tikka Masala is a high-protein vegetarian curry made with tofu, tomatoes, roasted makhana, and cashews. No cream needed — just simple, wholesome ingredients for a cozy homemade Indian dinner. Pair it with masala missi roti, naan, or rice, and some beetroot yogurt raita for the perfect meal! 🌿✨

Course: Dinner, Lunch, Main Course
Cuisine: Indian
Keyword: party, protein, vegan
Custom Category: Dinner, Indian Main Course, Lunch, Main Course
Servings: 6
Calories: 252 kcal
Author: Nidhi Bothra
Ingredients
Tofu Tikka:
  • 16 oz extra firm tofu pressed under a heavy weight in the fridge for 2 hours, (approx. 450 grams), cut into cubes
  • 1 cup mixed color bell peppers , cut into cubes
  • 1 large onions , cut into cubes
Marinade:
Blending Ingredients:
  • 4 large tomatoes , about 2 cups
  • 1/4 cup roasted makhana (popped lotus seeds)
  • 8-10 cashews
Gravy:
Garnish:
  • 1 tbsp ginger , chopped
  • 1 tbsp cilantro , chopped
  • 1 tbsp green onions , chopped
For Dhungar (Smoky Finish):
  • 1 coal
  • 1 tsp ghee
Serve:
  • masala missi roti or parathas
  • beetroot yogurt raita
Instructions
Marinate The Tofu:
  1. In a bowl, whisk together all the marinade ingredients

  2. Add the pressed tofu cubes along with bell peppers and onion. Coat everything well and refrigerate for at least 30 minutes.

Make The Gravy:
  1. Blend tomatoes with roasted makhana and cashews into a smooth paste.
  2. Heat ghee or oil in a pan, add bay leaf, cinnamon stick, and cloves.
  3. Add grated onions and sauté until golden brown. Stir in ginger-garlic-green chili paste.
  4. Add the tomato-makhana-cashew puree with chili powder, coriander powder, turmeric, salt, and kasoori methi. Cook covered until the oil separates.

  5. Stir in 2–3 tbsp leftover marinade and cook for another 2–3 minutes.

  6. Add milk, sugar, and finish with garam masala. Garnish with chopped ginger and cilantro.

Grill the Tofu Skewers:
  1. Roast the marinated tofu skewers directly over the gas flame until lightly charred and smoky.

    Traditionally, I like to roast the tofu skewers directly over the gas flame for that authentic smoky char. But you can also make it more convenient:

    Oven Method – Arrange the marinated tofu cubes with peppers and onions on skewers or a lined tray. Bake at 370°F (190°C) for 10–15 minutes, brushing with a little oil midway.

    Air Fryer Method – Place the marinated tofu in the basket and air fry at 350°F (175°C) for 10 minutes, checking halfway through and brushing lightly with oil for even roasting.

  2. Slide them into the gravy and mix gently.

Add Dhungar (Smoky Finish):
  1. Place a small steel bowl in the center of the pan and then place a hot coal in it. Drizzle ghee on top of the coal and cover the entire pan so that it becomes infused with a rich, smoky flavor. Let it infuse for 3–4 minutes, then remove the coal.

Serve:
  1. Serve your Tofu Tikka Masala with masala missi roti or paratha, and beetroot yogurt raita.

Recipe Video

Recipe Notes
  • Pressing Tofu is Key – Don’t skip pressing the tofu. It ensures the cubes are firm, absorb the marinade deeply, and hold well on skewers.
  • Balance the Heat – Kashmiri red chili gives color without much spice. Adjust with regular red chili if you prefer more heat.
  • Make it Vegan – Swap yogurt with plant-based yogurt and use oil and non-dairy milk.
  • Batch Cooking – The gravy can be made ahead and refrigerated for 2–3 days. Grill tofu fresh before serving.
Nutrition Facts
Tofu Tikka Masala
Amount Per Serving
Calories 252 Calories from Fat 144
% Daily Value*
Fat 16g25%
Saturated Fat 6g38%
Trans Fat 0.02g
Polyunsaturated Fat 2g
Monounsaturated Fat 5g
Cholesterol 24mg8%
Sodium 101mg4%
Potassium 675mg19%
Carbohydrates 20g7%
Fiber 4g17%
Sugar 11g12%
Protein 10g20%
Vitamin A 1450IU29%
Vitamin C 42mg51%
Calcium 123mg12%
Iron 2mg11%
* Percent Daily Values are based on a 2000 calorie diet.

Subscribe to my YouTube Channel for step-by-step videos.

DID YOU MAKE THIS RECIPE?

Don’t forget to tag @naturallynidhi on Instagram and hashtag it #naturallynidhi. You can also post your pictures to my facebook page.

I’d love to hear how the recipe turned out and what you think in the comment section below. Find me on Instagram Facebook Twitter Pinterest YouTube and share your creation with me!